Creating mind maps on iOS
This guide provides detailed instructions to help you efficiently create, organize, and customize mind maps and folders on your iPhone or iPad. Discover how to utilize templates, leverage AI-assisted mind mapping, and manage your diagrams within the app to enhance your productivity and workflow.
Create mind maps and folders
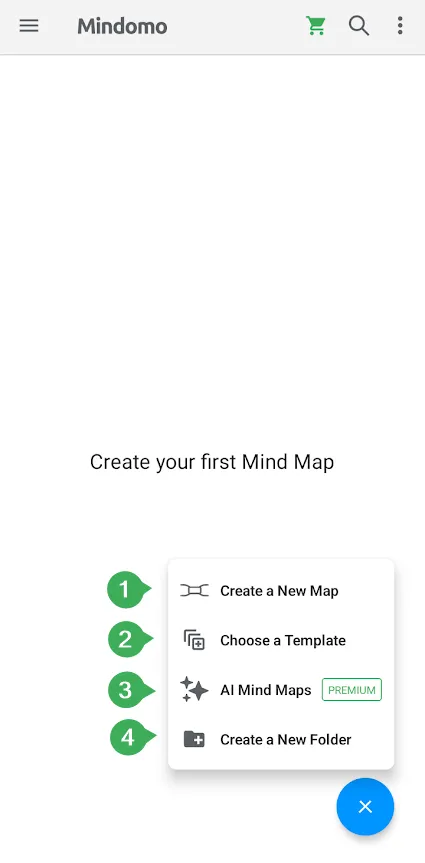
Section titled “Create mind maps and folders”Tap on the + sign on the lower right corner, to create:
-
New mind map
-
Choose a template
-
Generate a mind map from scratch with AI
-
New folder
Use a template
Section titled “Use a template”Choosing a template will allow you to use a predefined theme and color scheme for your mind map, concept map, or organigram.
We also offer mind map templates that are prefilled and contain instruction on how to complete them.

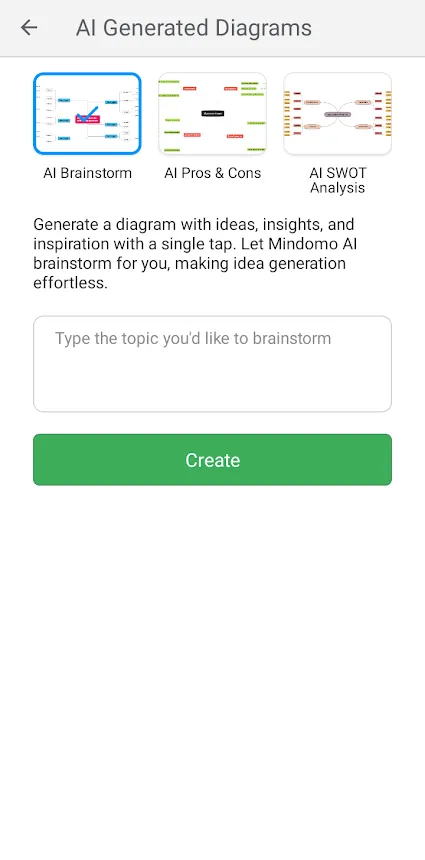
Use AI mind maps
Section titled “Use AI mind maps”Mindomo AI allows you to generate instantly some distinct types of mind maps, each tailored to specific needs and preferences:
- Brainstorm
- Pros & Cons
- SWOT Analysis
Select the diagram type you wish to create using Artificial Intelligence (AI), then enter a topic for analysis/ brainstorming. Mindomo AI will generate a fully editable diagram for you.
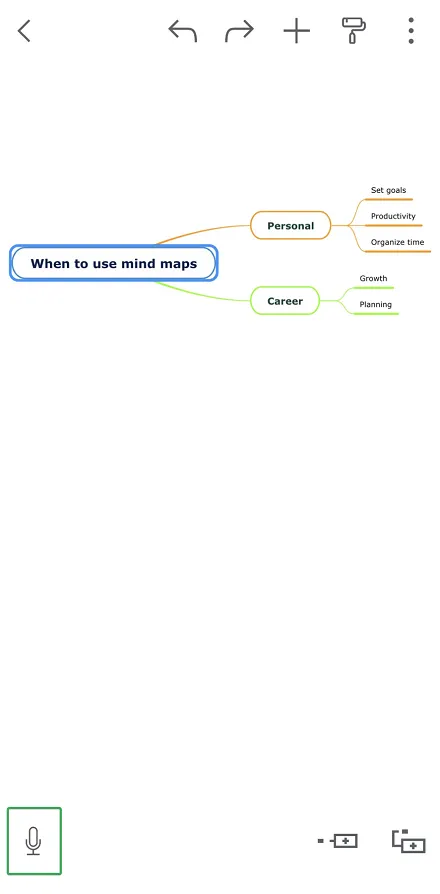
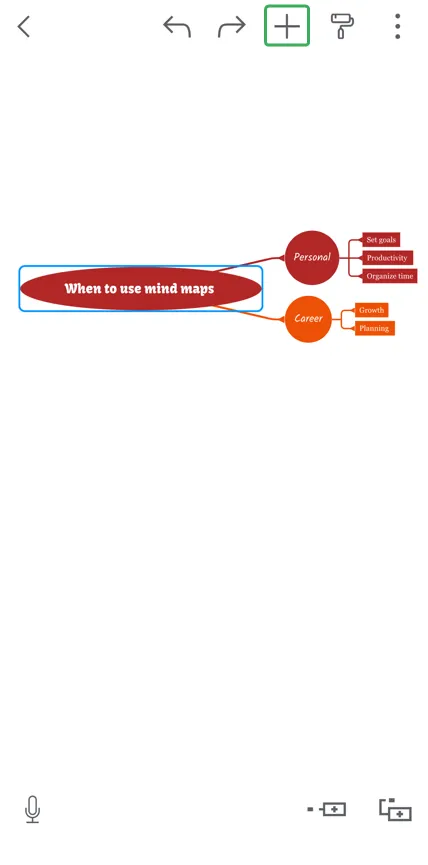
Add topics
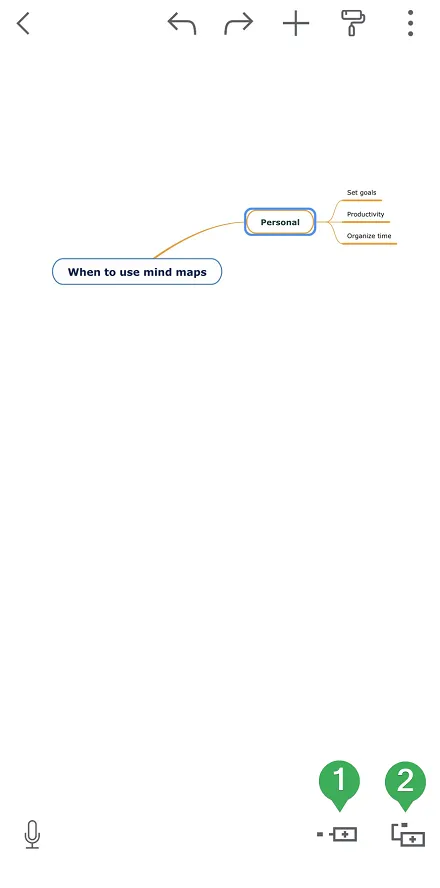
Section titled “Add topics”-
Add subtopic by tapping on the first icon from lower right corner
-
Add sibling topic by tapping on the second icon from lower right corner
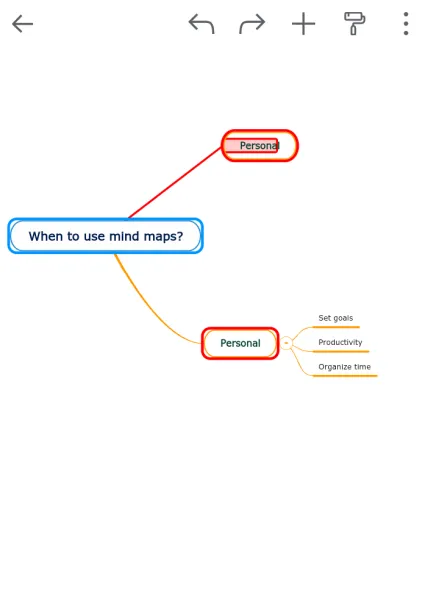
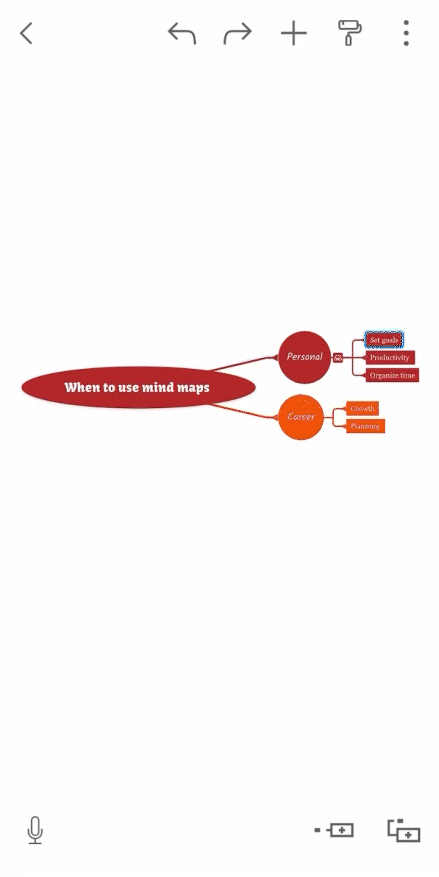
Move topics
Section titled “Move topics”To move/reposition a topic, touch & hold until the red frame appears around the topic, then drag it to the new location.
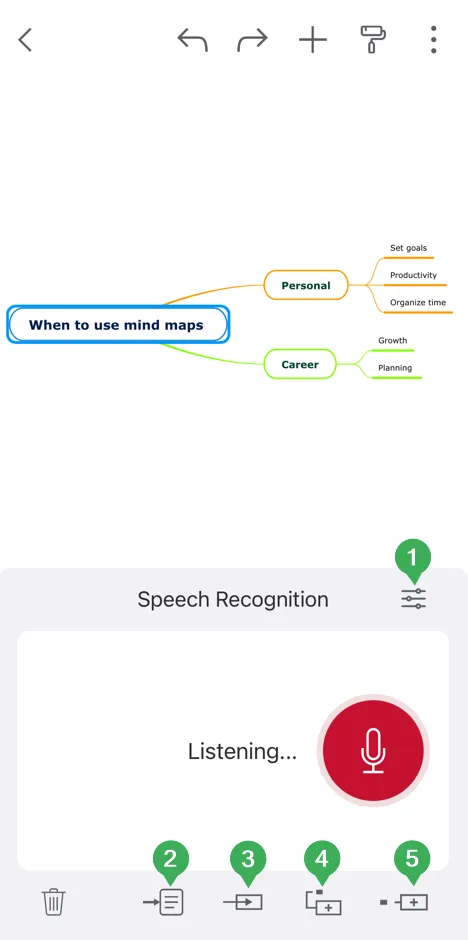
Speech-To-Text functionality
Section titled “Speech-To-Text functionality”This functionality enables the recognition of spoken language into text.
Before speech recognition, select the the language (1). You will be able to insert the text into a Note (2), into a selected (sub)topic (3), into a new sibling topic (4) and into a new subtopic (5).
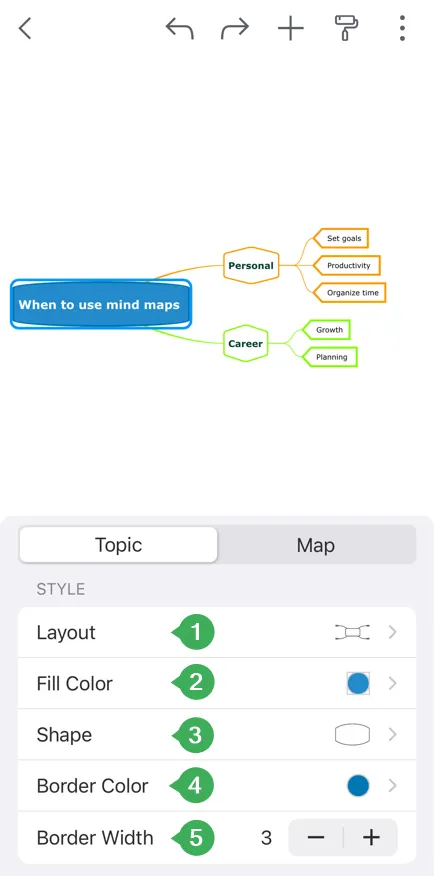
Topic customization
Section titled “Topic customization”To customize a topic, tap on the Style icon from the upper right corner and then tap on the topic you would like to change:
You can customize the selected topic (Topic panel) or the entire diagram (Map panel).
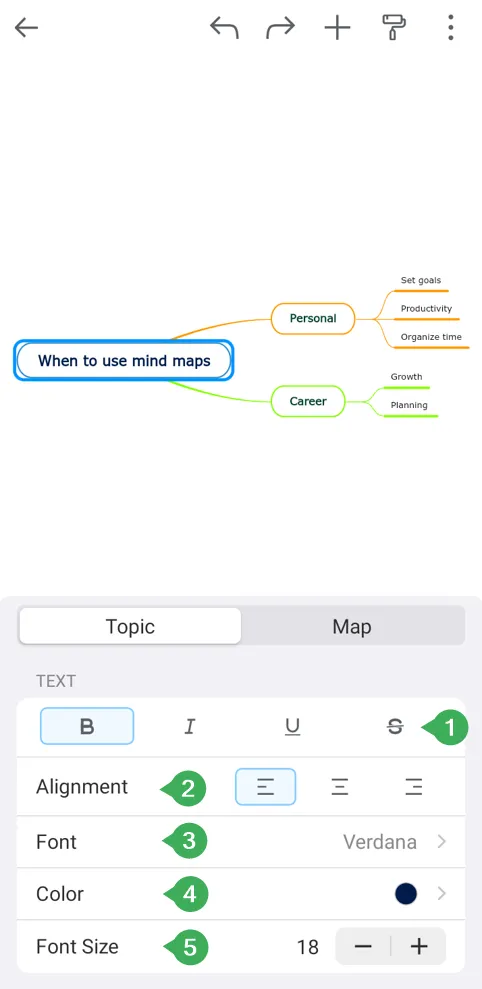
Text customization
Section titled “Text customization”In the Topic panel, you have the TEXT category where you can set:
-
Bold, Italic, Underline and Strikethrough - use these options to format your text
-
Alignment - you can choose Left, Center or Right
-
Font - choose from various font families
-
Color - select the color of your text
-
Font size
Style customization
Section titled “Style customization”Scroll down to the Style category. Here you can change:
-
Layout - choose from several layout types - can be changed for the whole mind map, or can be set for certain branches
-
Fill Color - choose a background color for your topic
-
Shape - there are various topic shapes you can choose from: rectangle, rounded rectangle, elliptic rectangle, circle, oval, line, capsule, parallelogram, hexagon, rounded hexagon, diamond, left arrow, right arrow, trapeze, cloud, speech bubble etc.
-
Border Color - choose a border color for your topic
-
Border Width - use the two arrows to adjust the width of your topic’s border
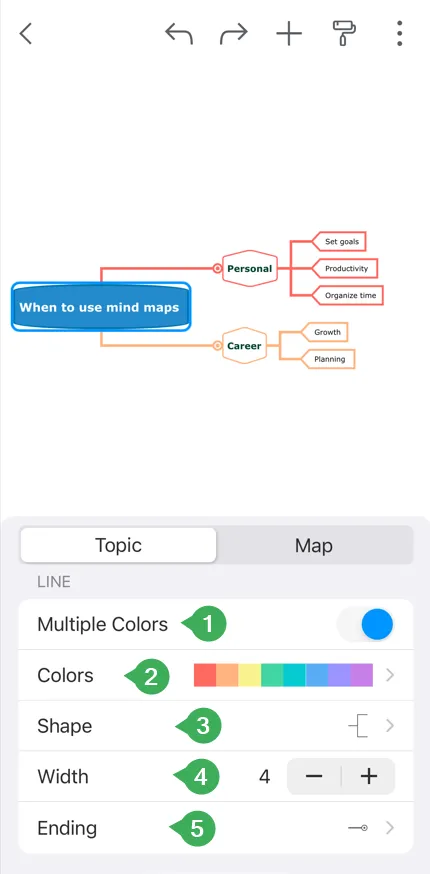
Line customization
Section titled “Line customization”Scroll down to the Line category. Here you can change:
-
Multiple Colors - enable this option if you want your connections to have a rainbow color scheme
-
Colors - you can select the scheme of colors for your connections. If the “Multiple Colors” option is not active, you will only be able to select a single color for your lines
-
Shape - there are various line shapes you can choose from: straight, arc, rough, curve, elbow, rounded elbow, angle, no line, etc.
-
Line Width - adjust it to make the connections thinner or thicker
-
Ending - there are various line ending types you can choose from
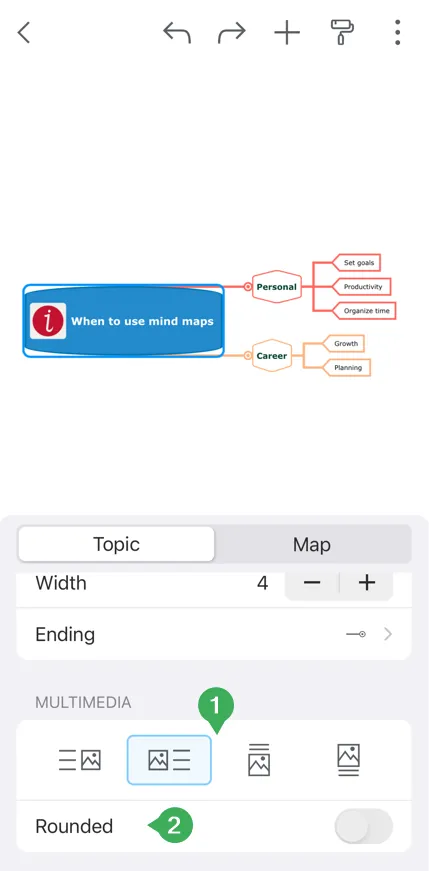
Multimedia customization
Section titled “Multimedia customization”Scroll down to the Multimedia category. If you added an image inside a topic, here you can change:
-
Alignment - choose the alignment of the image inside the topic: right, left, bottom, or top
-
Rounded corners - enable this option if you want to apply rounded corners to the image
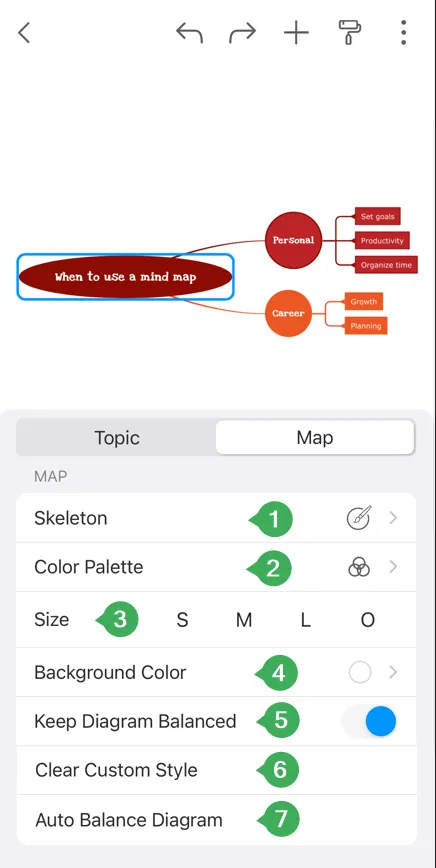
Map customization
Section titled “Map customization”In the Map panel, you can customize the entire diagram:
-
Skeleton - choose one of the predefined structures
-
Color Palette - choose one from our predefined colors
-
Size - choose one of the size options for your mind map
-
Background color - select a background color for your mind map
-
Keep diagram balanced- by enabling this option, the topics of your mind map will be auto-aligned
-
Clear custom style
-
Auto Balance diagram
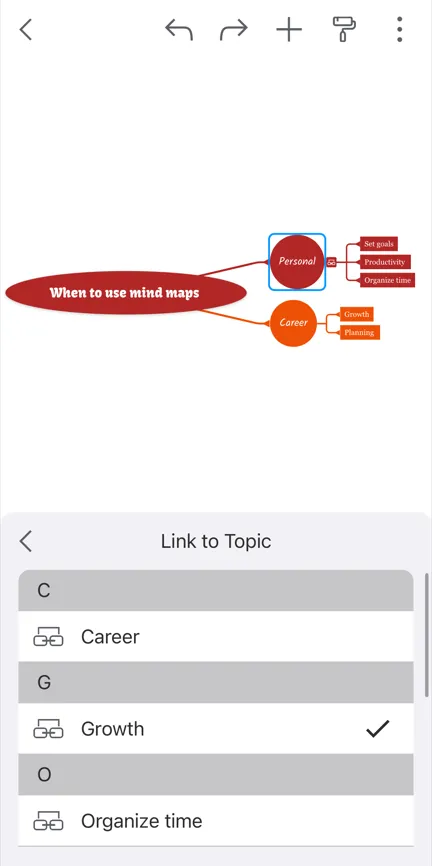
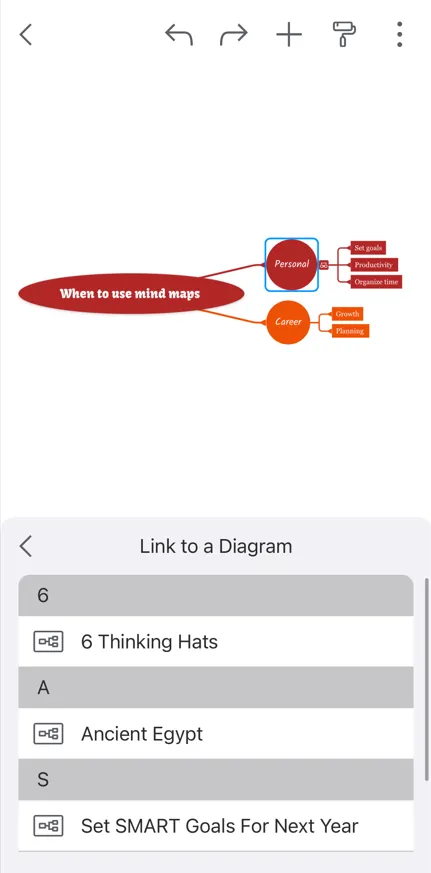
Insert panel
Section titled “Insert panel”To enrich your mind map with notes, icons, images, etc., tap on the Insert icon on the top-right corner:
The Insert panel gives you the options to add the following:

-
Notes - add or remove notes to the topics of your mind map
-
Hyperlink - add hyperlink to your topics
-
Link to Topic - add a link that navigates to a specific topic in this diagram when clicked on
-
Link to a Diagram - add a link to one of your diagrams (clicking on it will open the designated diagram)
-
Attachments - add attachments
-
Text Scan - With this option you can either scan the text taking a new photo or choosing a photo from library. After taking a new photo or choosing a photo from library you can: Replace text on topic, Add text as new subtopic, or Add each line as subtopic.
-
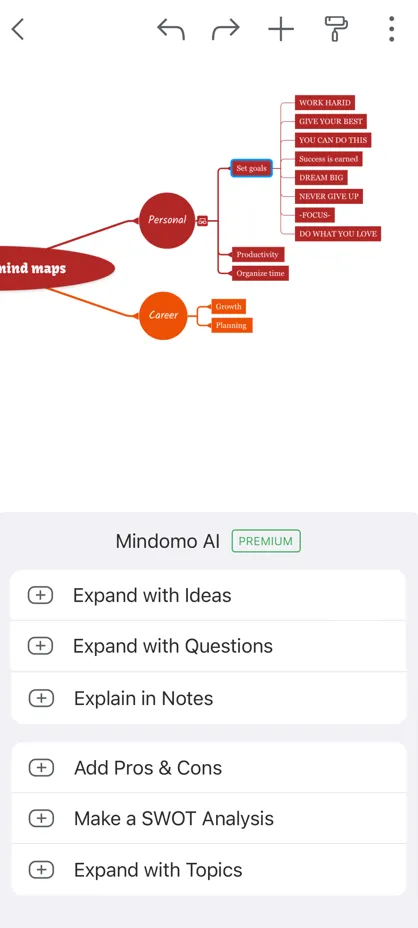
Generate with AI - There are 6 options you can choose to expand your diagram using Mindomo AI:
- Expand with Ideas: produce succinct yet impactful ideas, each presented in a sentence of no more than 15 words. These ideas are added as subtopics to your selected topic.
- Expand with Questions: adds a set of questions associated with your selected topic.
- Expand in Notes: automatically creates detailed explanations in the notes section.
- Add Pros & Cons: adds a few pro and con arguments in subtopics, ensuring a comprehensive examination of your selected topic.
- Make a SWOT Analysis: automatically generates a SWOT analysis, highlighting the strengths, weaknesses, opportunities, and threats, arranged in separate subtopics, offering a holistic view of your subject.
- Expand with Topics: expand your mind map with five additional subtopics.
-
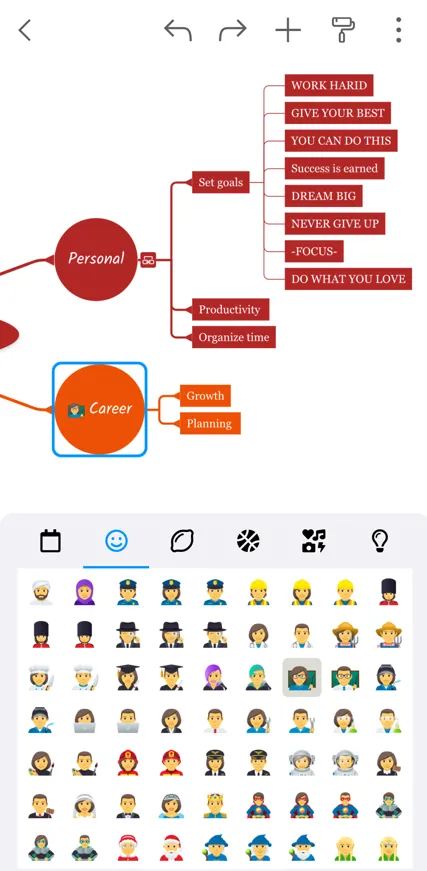
Icon - add icons on your topics. Tap on the icon from inside the list to remove it.
-
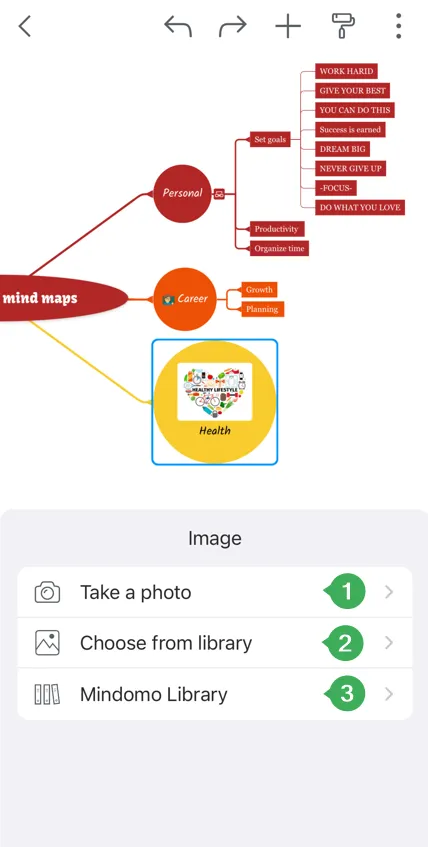
Image - you can take a photo (1), choose an image from library (2), or choose an image from Mindomo library (3)
-
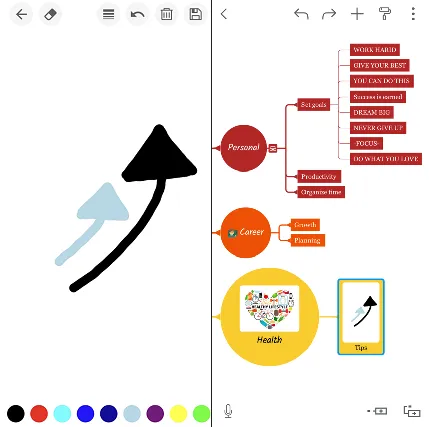
Quick Draw - this option will open a blank canvas so that you can freely doodle, and insert your drawing directly in the topic
-
Audio - record audio
-
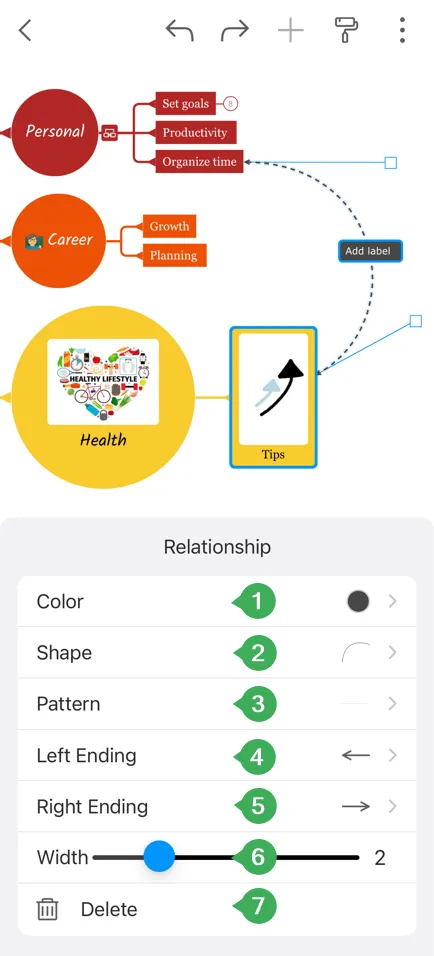
Relationship - add a relationship between two topics of your mind map. Tap on the relationship and then on the Style icon to customize the relationship label (1. color, 2. shape, 3. pattern, 4. and 5. arrows’ endings, 6. width, 7. delete relationship)
-
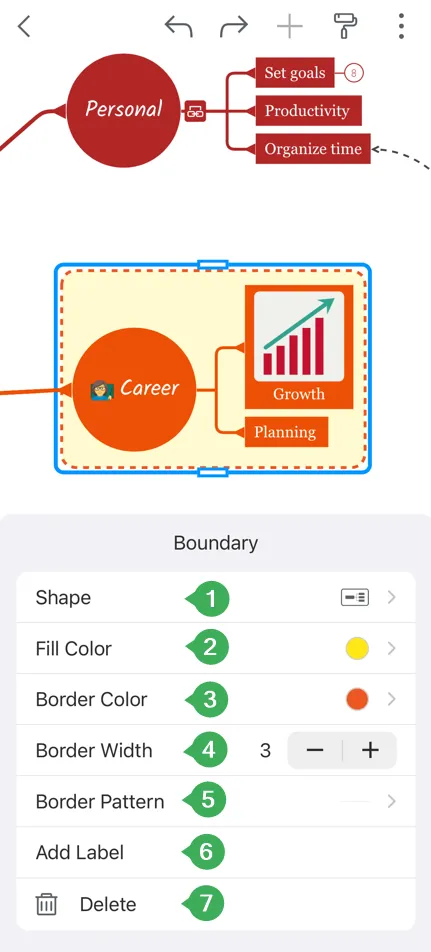
Boundary - add boundary to mark and determine the limits of an area on your diagram. Furthermore, you can change the shape (1), fill color (2), set border color (3), width (4) and pattern (5), edit label (6) or delete boundary (7).
-
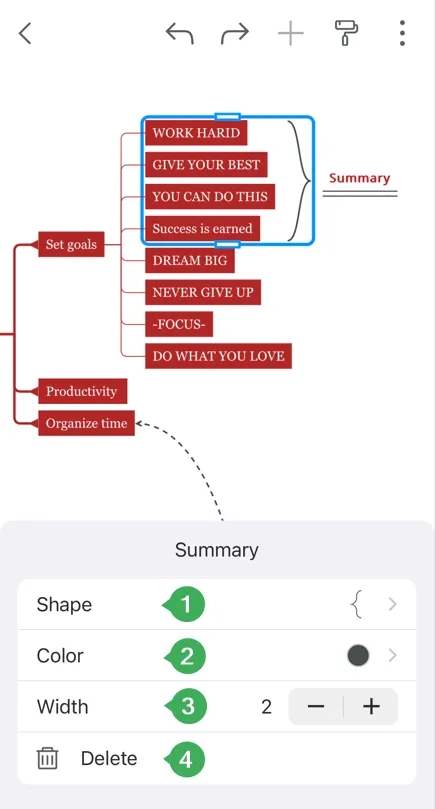
Summary - After adding the summary, you will be able to customize its shape (1), border color (2), or border width (3), or delete summary (4).
-
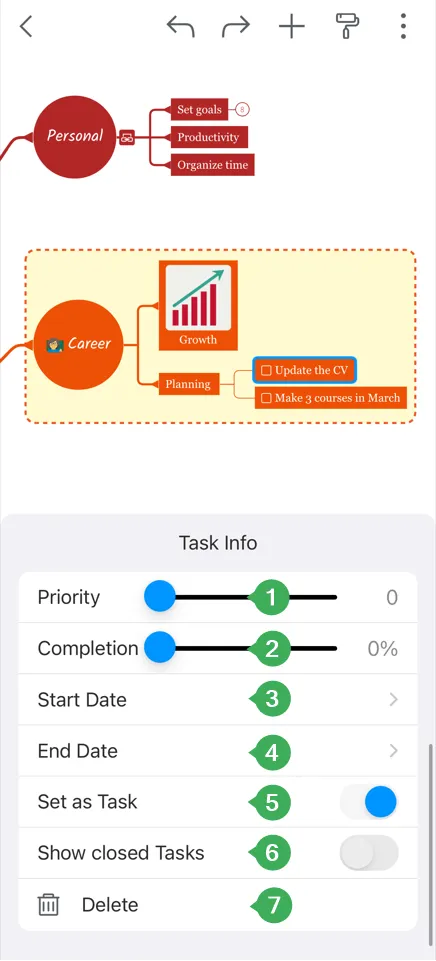
Task Info - set priority (1), completion (2), start and end date (3, 4). A checkbox will appear in front of task subtopics (5). Make sure that the Show completed tasks (6) option is enabled to view all the completed tasks, and you can also delete it (7).
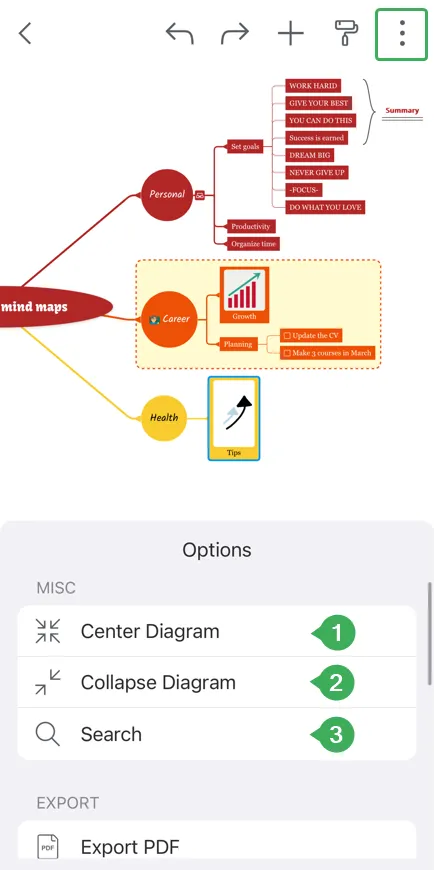
Option panel
Section titled “Option panel”-
Center Diagram - use this option to reset the position of your diagram on the canvas
-
Collapse Diagram - use this option to hide all subtopics
-
Search
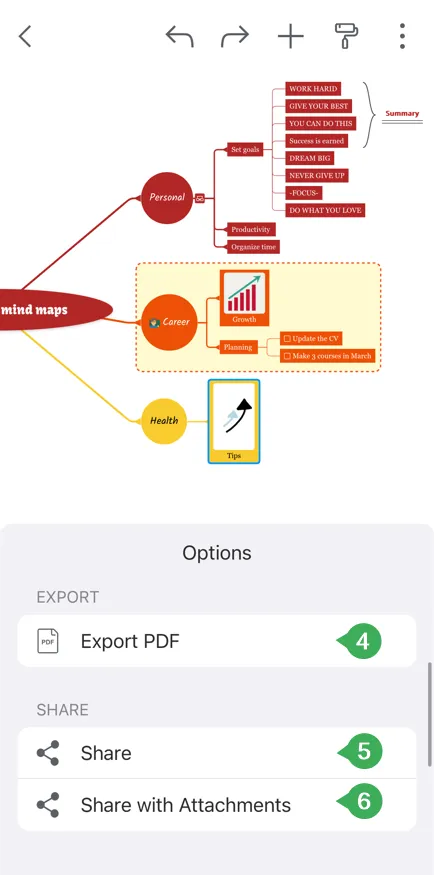
-
Export PDF - store your diagram locally on your device, in PDF format
-
Share
-
Share with attachments
-
Play Presentation
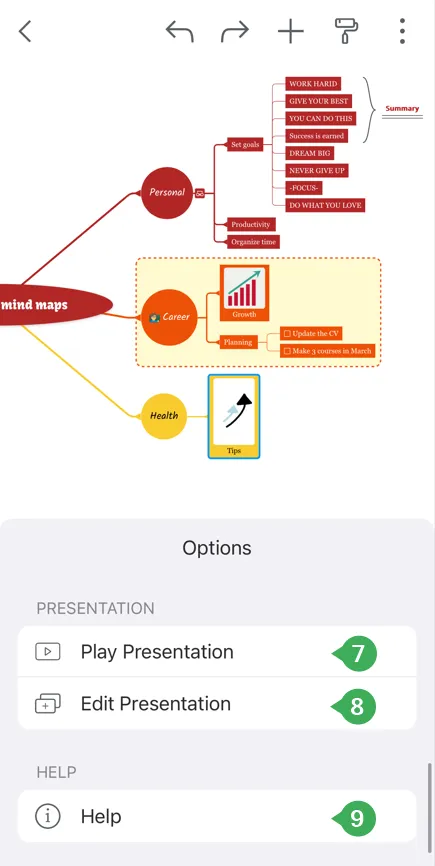
-
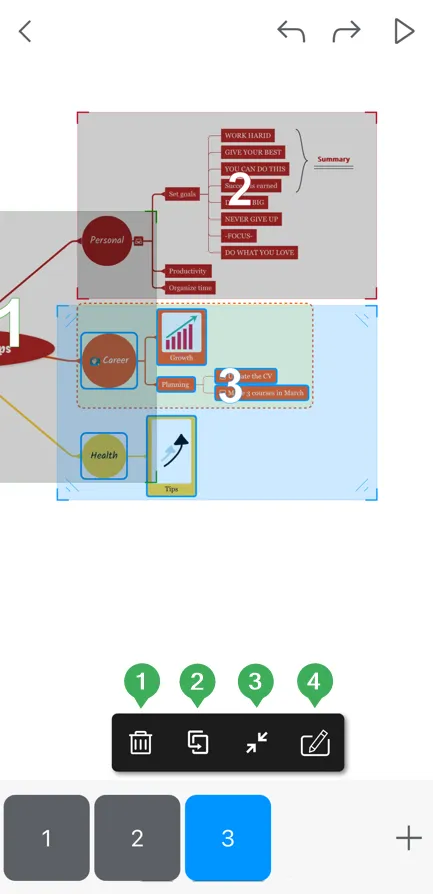
Edit Presentation - to insert a new slide tap on + sign. Select the topics you want to include in your slide by drawing a rectangle on the screen with your finger.
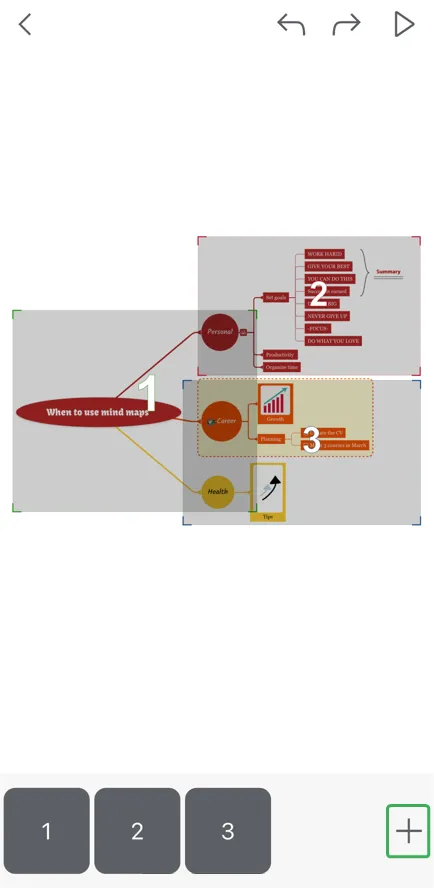
By tapping on the number of the slide in the bottom of your screen, you will be able to delete a slide (1), duplicate a slide (2), resize a slide (3), and include/exclude topics from the slide (4).
9.Help page - opens the help section
Access your Mindomo Cloud account
Section titled “Access your Mindomo Cloud account”Mindomo mobile app has two sections you can use:
- Cloud: you need to log in to a Mindomo Cloud account, and the diagrams stored in this section will be automatically synced to your Cloud account (and you’ll be able to access the diagrams from any device).
- Device: diagrams will be stored on your device’s local storage.
To access the Cloud section, follow these steps:
-
Tap on the File menu
-
Tap on Cloud
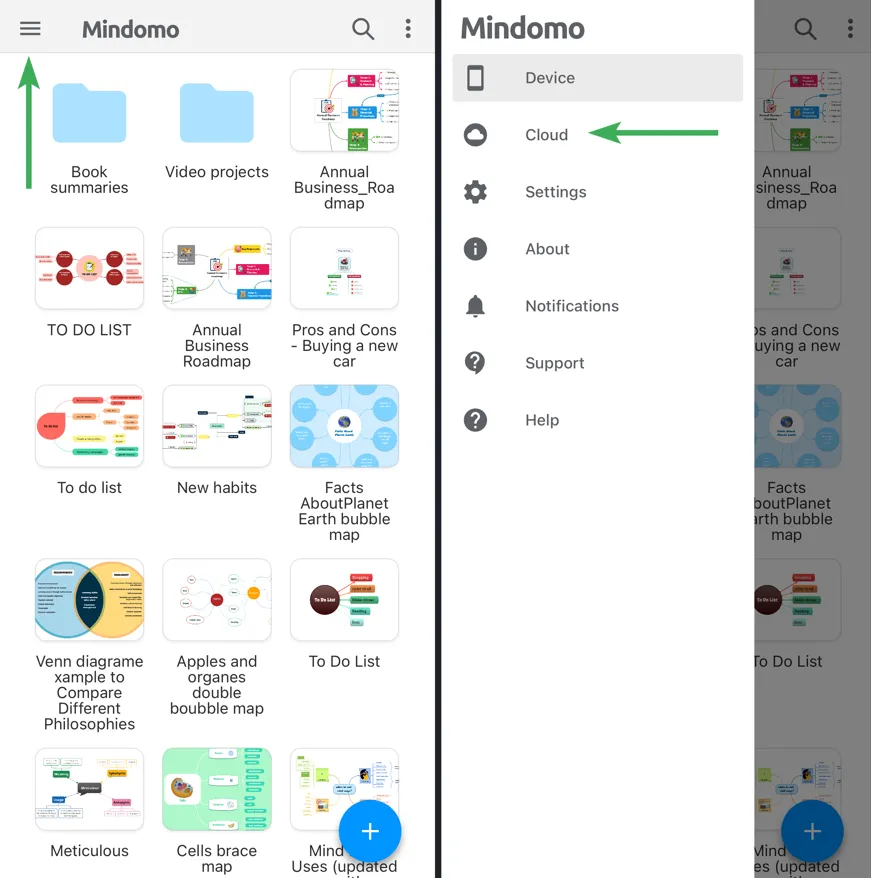
-
Log in with your registered email address and password
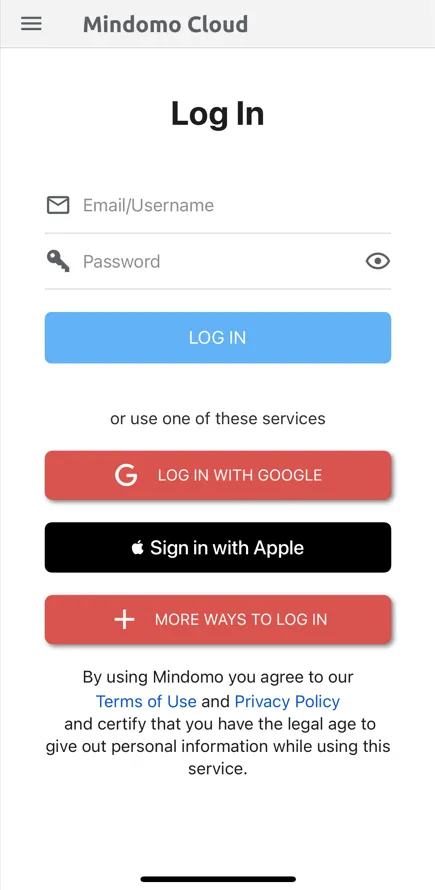
In case you don’t have a Mindomo Cloud account, use one of the following options:
Log in with Google
Section titled “Log in with Google”You can use your Google account to simply create a Mindomo account instantly. Tap on Log in with Google, then log into your Google account.
Sign in with Apple
Section titled “Sign in with Apple”You can use your Apple ID to simply create a Mindomo account instantly. Tap on Sign in with Apple, then select your preferred option (continue with the Apple ID email or passcode).
Log in using other account
Section titled “Log in using other account”Use this method only if you previously signed in from the browser version of Mindomo using your Facebook, Yahoo, Office365, Windows Live, Clever, Skolon Yilan, or SAML account. When you signed in to Mindomo from a browser using one of these accounts, a Mindomo Cloud account was created, and now you can set up a password to log in from the mobile app as well.
Tap on More ways to log in. Then type in the email address linked to the Facebook, Yahoo, Office365, Windows Live, Clever, Skolon Yilan, or SAML account you’ve used. Then tap on Set Password.
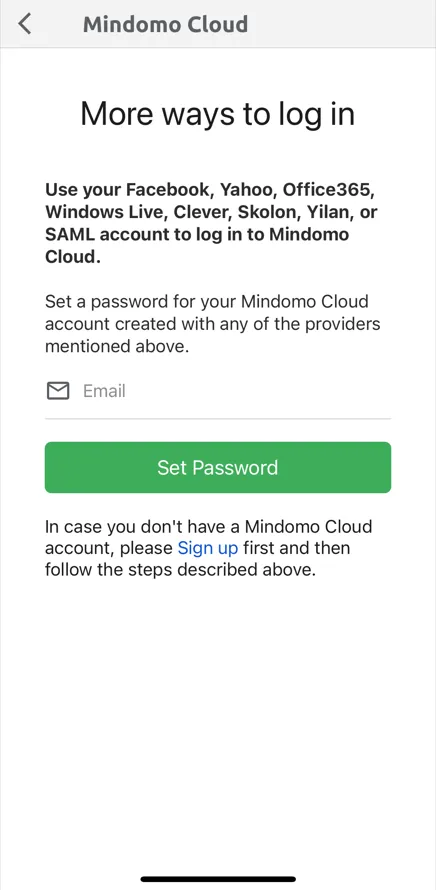
Follow the instructions you receive in your email. Afterward, return to the Mindomo app and use the email address and the new password to log in to your account.
Sign up
Section titled “Sign up”To create a new Mindomo account, use this link and follow the steps: Sign up. After creating a Mindomo Cloud account, you can log in from any device or browser.
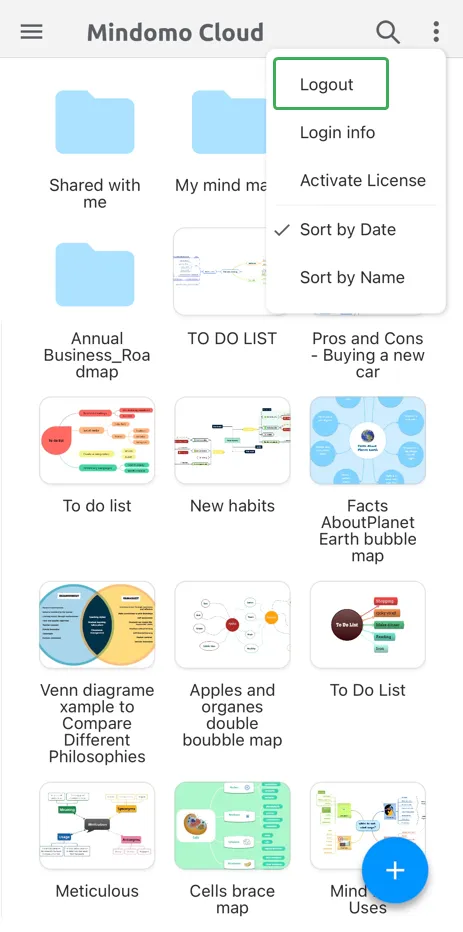
Log out
Section titled “Log out”-
To log out from your account tap on the More icon then on Logout
Mindomo Cloud folder
Section titled “Mindomo Cloud folder”-
The Cloud folder contains your diagrams from your online account.
-
When you are online, any changes you make to your diagrams in the Cloud folder will be automatically synced to your online account.
-
When you are offline, the changes you make to your diagrams in the Cloud folder are automatically saved and when you reconnect to the internet, the changes you’ve made on your diagram when you were offline will be synchronized with the online version.
-
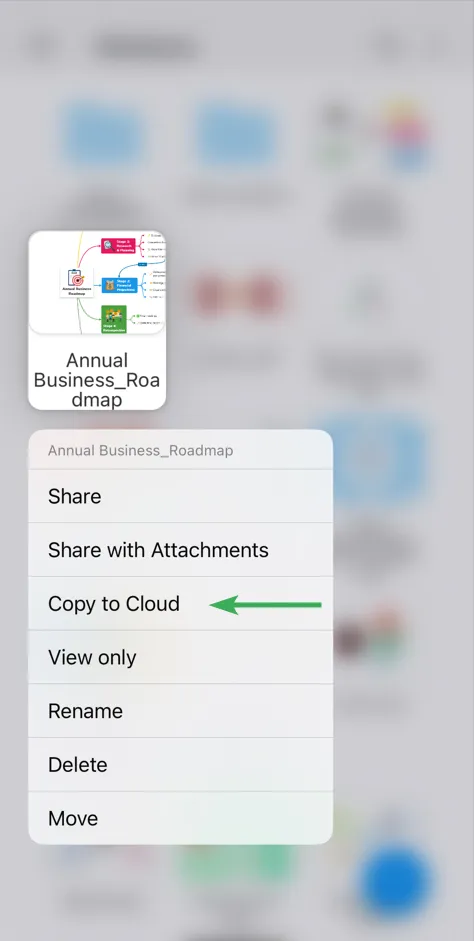
To move a diagram from your local folder (Device) to the Cloud folder, long tap on the diagram, then on Copy to Cloud. This will create a copy of your diagram in your Cloud folder.
Mindomo Device folder
Section titled “Mindomo Device folder”In that folder are the diagrams that are located only on your device. They will not be synchronized with the online account unless you move them to the Cloud folder.
Save changes to maps
Section titled “Save changes to maps”The changes you’ve made to the diagrams in the local or cloud folder are automatically saved on your device.
Notifications
Section titled “Notifications”Mindomo has two categories of mobile notifications: Quick Recap Notifications (reminders from diagrams stored on the Device Folder) and Cloud Notifications (notifications from your diagrams saved on your Mindomo Cloud).
At any time, you can adjust Notification Settings by following these steps: navigate to the File menu, then select Settings. Here, you’ll find a toggle switch that is enabled by default (toggling this will activate or deactivate all notifications). Click on Notifications for further customization.
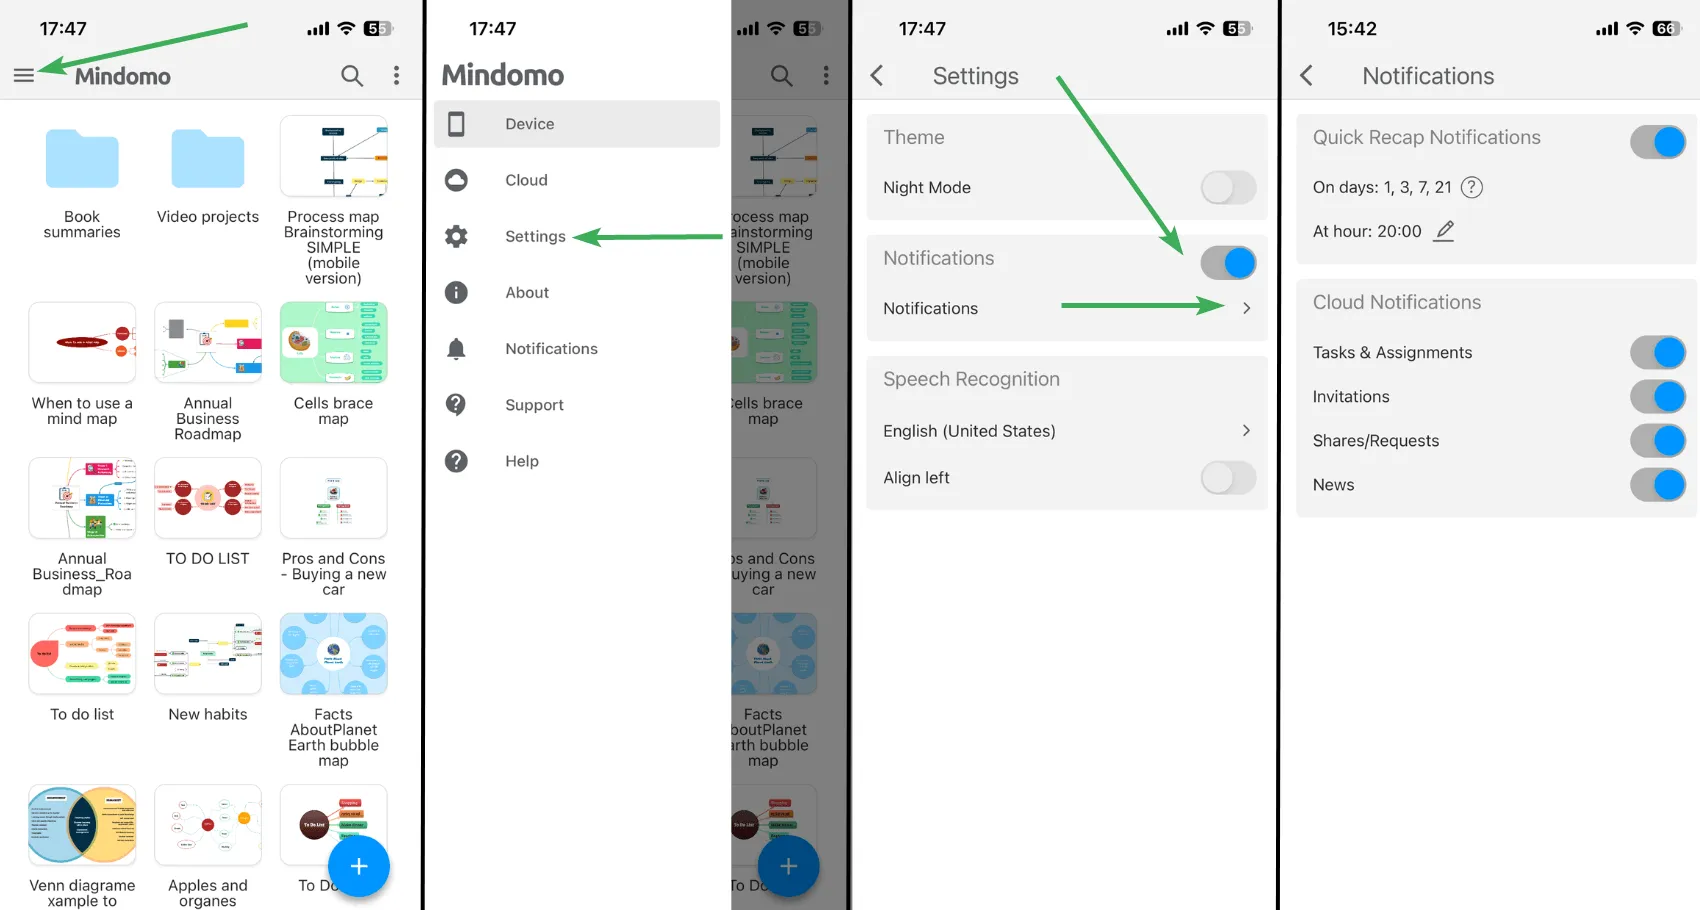
Quick Recap Notifications
Section titled “Quick Recap Notifications”The Quick Recap Notifications serve as reminders to review diagrams that have been inactive and are stored in the Device folder. These notifications are sent out after 1, 3, 7, and 21 days of inactivity on a diagram. From the settings, you have the option to select the specific hour at which you wish to receive them.
Cloud Notifications
Section titled “Cloud Notifications”The Cloud Notifications from the mobile mirror the Email notifications you receive but are also delivered to your mobile device. These notifications are automatically and instantly sent in various situations, organized into the following categories:
1. Tasks & Assignments
Section titled “1. Tasks & Assignments”Task notifications will keep you updated on your tasks by notifying you when important changes occur. You’ll receive notifications when:
- a task is assigned to you
- someone comments on a task you’re involved with
- a task is completed or reopened
- changes are brought to the due date
- a task is due soon
- deadline has been exceeded
- a task is about to start
Notifications for all tasks due or set to start the current or the following day are sent once daily in the morning.
Notifications for all tasks due or overdue the current week are sent once weekly, on Monday morning.
If you are using an Education account (Student/Teacher/School) you will receive assignment notifications that will keep you informed about key updates. You’ll receive notifications when:
- an assignment is submitted or unsubmitted
- comments are added to the assignment
- changes are brought to the due date
- an assignment is due soon
- due date has been exceeded
2. Invitations
Section titled “2. Invitations”These notifications are automatically sent whenever you are invited to join a team or collaborate on a diagram. For Educational licenses, you will also receive invitation notifications when you are invited to join a school or work on an assignment.
3. Shares/Requests
Section titled “3. Shares/Requests”These notifications will be automatically sent when a diagram is shared with you and when someone requests access to collaborate on your diagram.
4. News
Section titled “4. News”These notifications will be sent whenever changes and improvements are brought to our application.