Working with Mind Maps
This guide walks you through all the tools and customization options available for working with topics in your Mindomo diagrams. You’ll learn how to make your maps functional and visually engaging by inserting and styling topics, adding notes, relationships, media, and more.
Insert topic
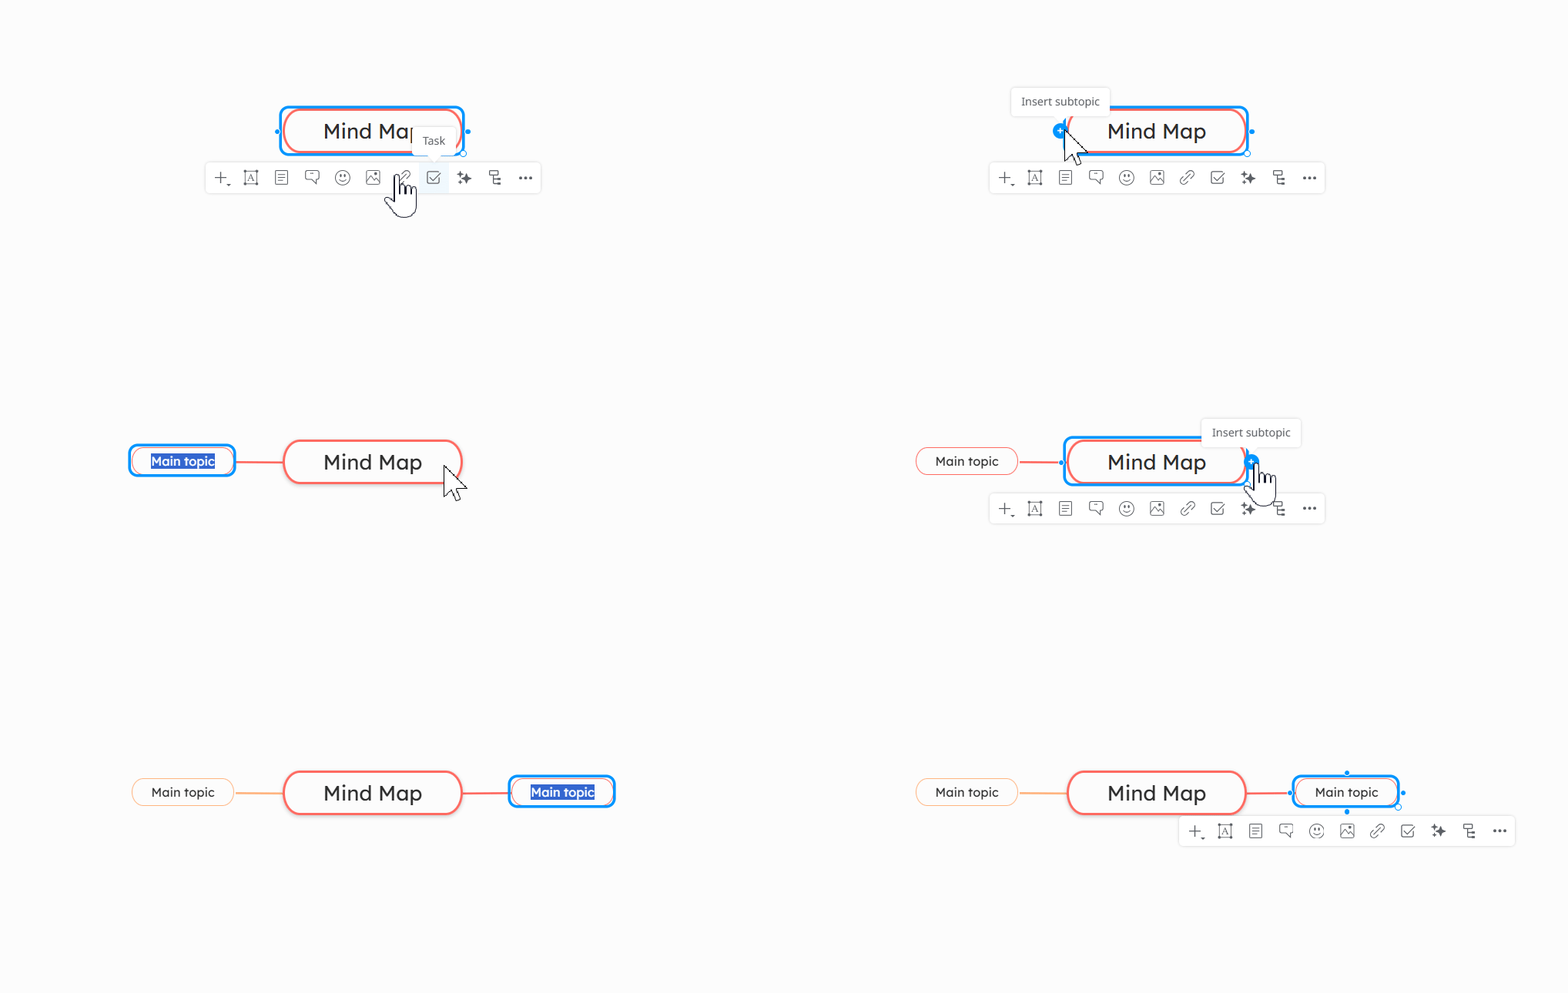
Section titled “Insert topic”1. To insert a new topic, select an existing topic:
- Central topic - Once the topic is selected, two bullets will appear. Clicking the left bullet will insert a subtopic on the left side, while clicking the right bullet will insert a subtopic on the right side.
- Subtopic - Once a subtopic is selected, four bullets will appear: left to insert a parent topic, right to add a subtopic on the right, top to insert a sibling before, and bottom to insert a sibling after.
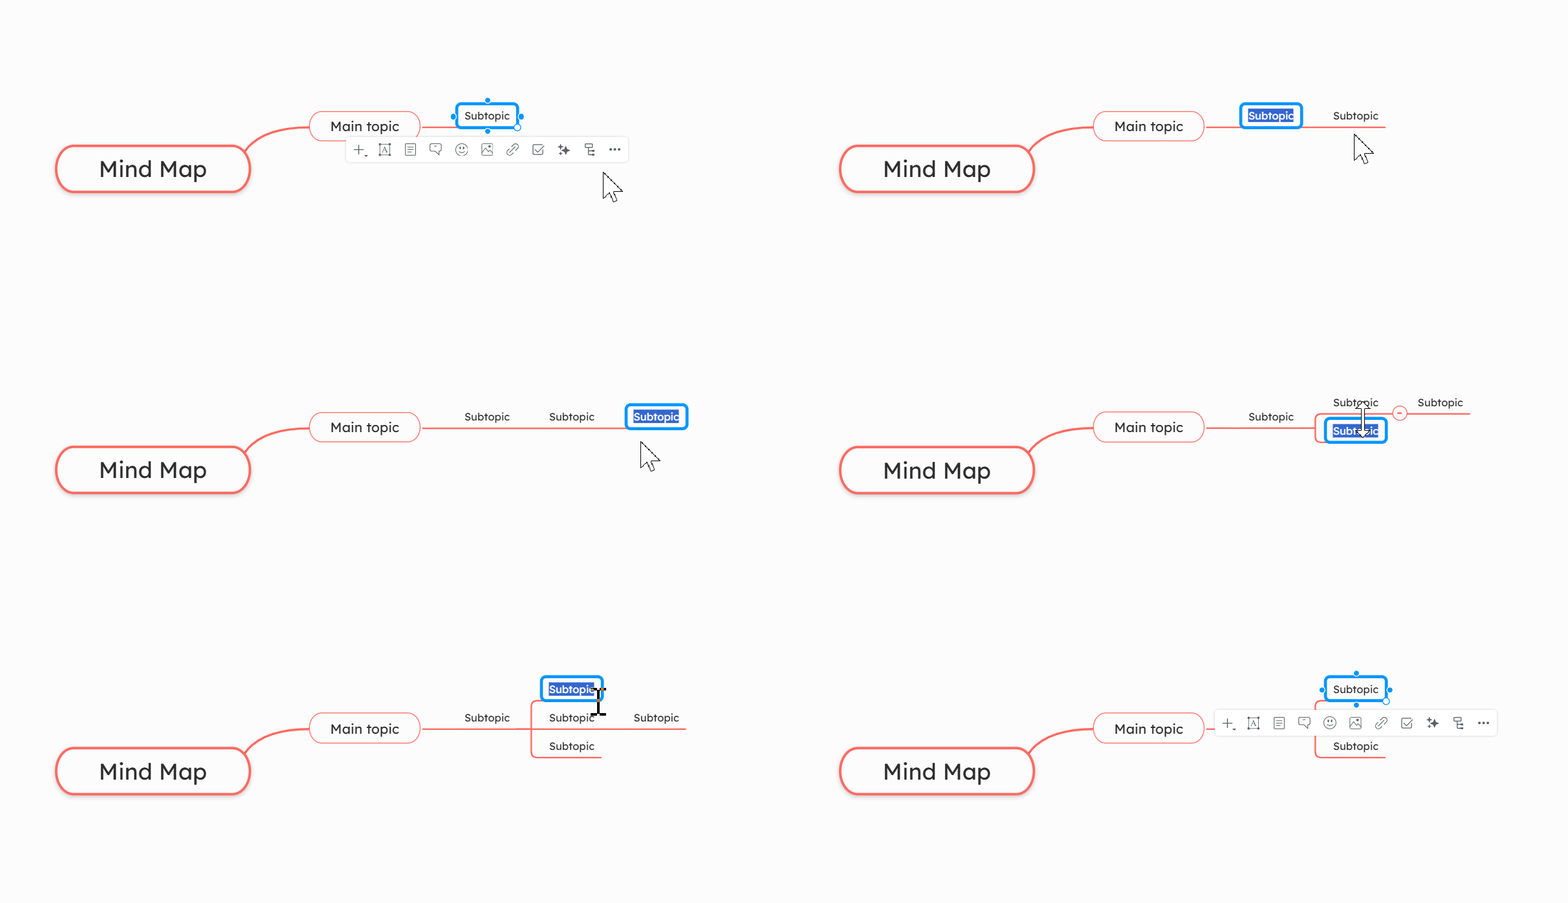
2. Use the keyboard shortcuts for quicker topic creation: press the TAB key to insert subtopic and ENTER to insert a sibling topic.
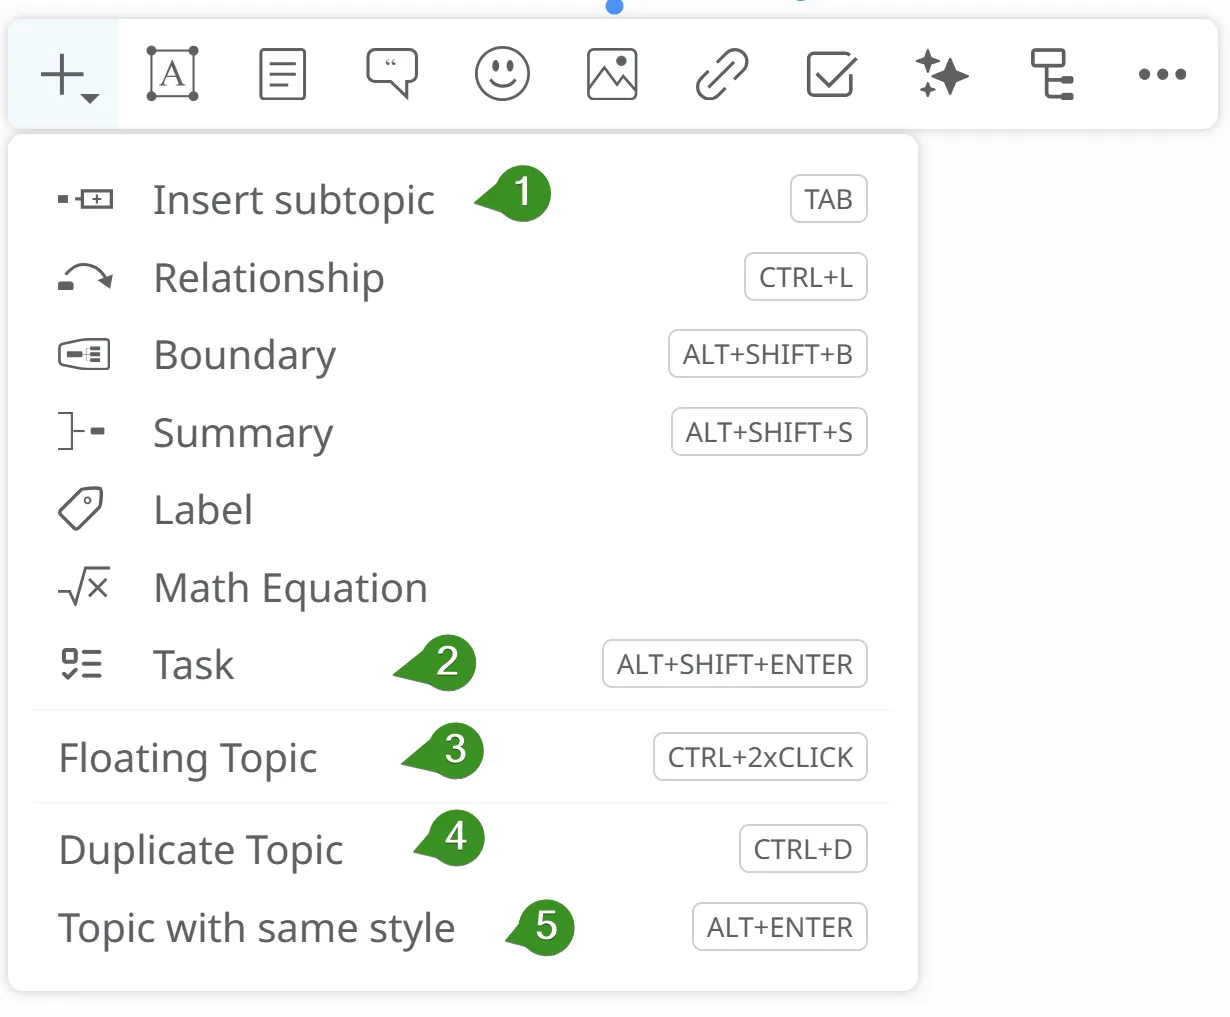
3. Click the ” + ” button from the toolbar to insert a subtopic (1), subtopic as task (2), floating topic (3), duplicate the topic (4) or add a new topic with current topic’s style (5).
Topic Style
Section titled “Topic Style”Use the Topic Style panel to customize the appearance of a topic. You can format text, change the background color, customize topic shape, or apply existing topic styles.
1. Topic’s text customization
This panel provides tools to customize the visual style of your topic text, including formatting, alignment, font, and color options.
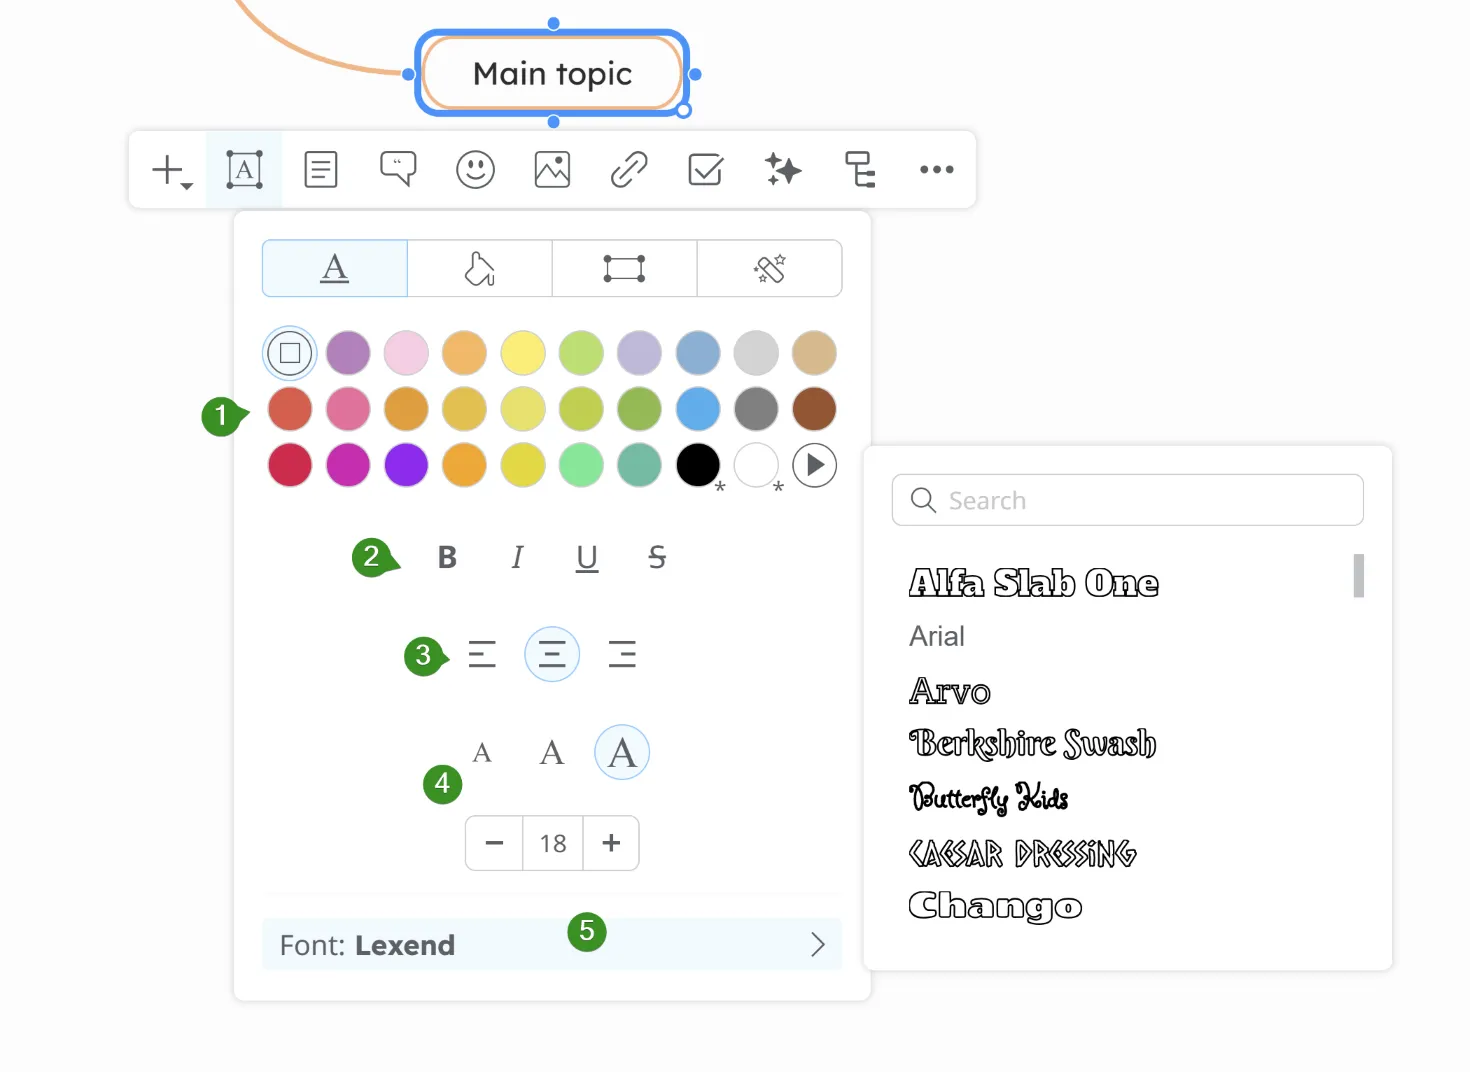
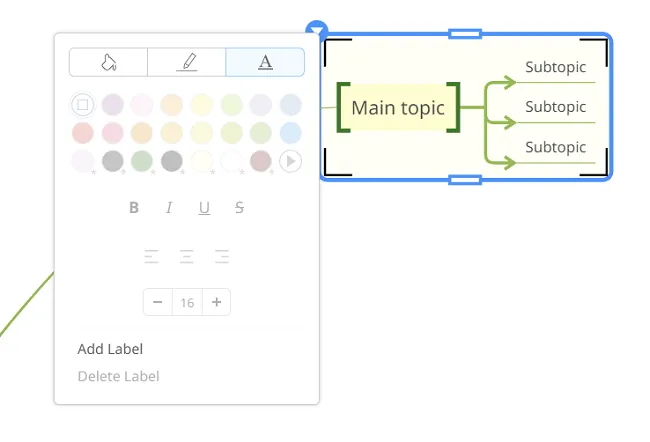
- Font Color - click the arrow to access the color picker
- Bold, Italic, Underline and Strikethrough - use these to format your text
- Text Alignment - you can choose left, center or right
- Font Size - adjust the size of your text
- Font Family - choose from various fonts
Alternatively, select text directly in the topic to access a context menu:
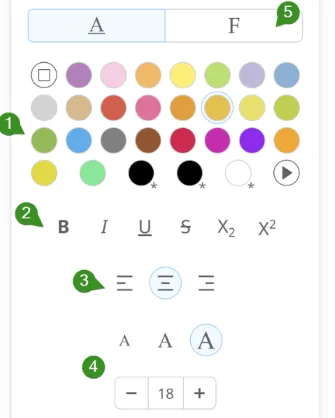
- Change the text color
- Change the typographical emphasis
- Change the text alignment
- Change the text size
- Change the font
2. Topic color
This panel provides options to change a topic’s color.
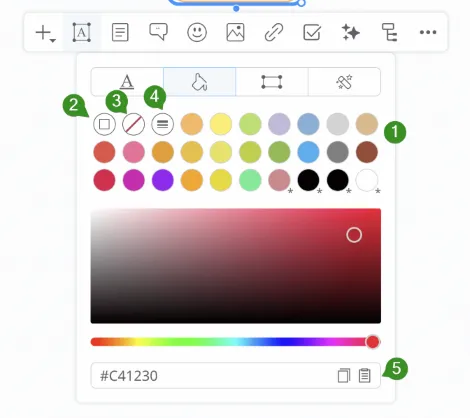
- Select Topic color
- Default color
- Transparent
- Line color - the color of the connecting line defines the topic color
- Copy/Paste color hex values
3. Topic shape
This panel lets you choose the shape of the topic and customize it.
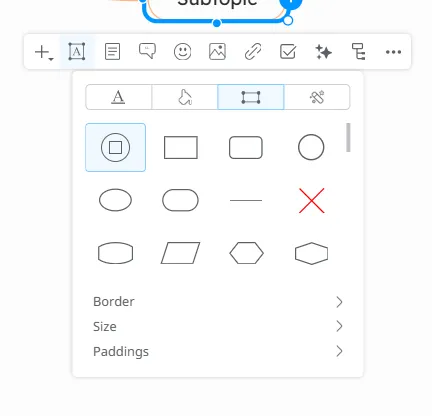
- Choose the shape of the topic
- Adjust the border size. You can either match the width with all siblings/branches or set custom width and height for selected topics
- Adjust padding / Reset to default values
- Customize border (color and size)
4. Topic styles
In the predefined topic styles section you will find:
- all the topic styles used in the current diagram
- if you created a custom topic style, this will appear at the top of the list so you can use it anywhere in the current diagram. If you also customize the topic’s connections from it’s context menu, these will be saved together with the customized style of the topic
- changing the style of a topic will change the style of its connections as well
- at the bottom of the list, you will find all the topic styles from the custom themes that you previously created from the theme editor. These will be displayed in all your diagrams.
Fill Style
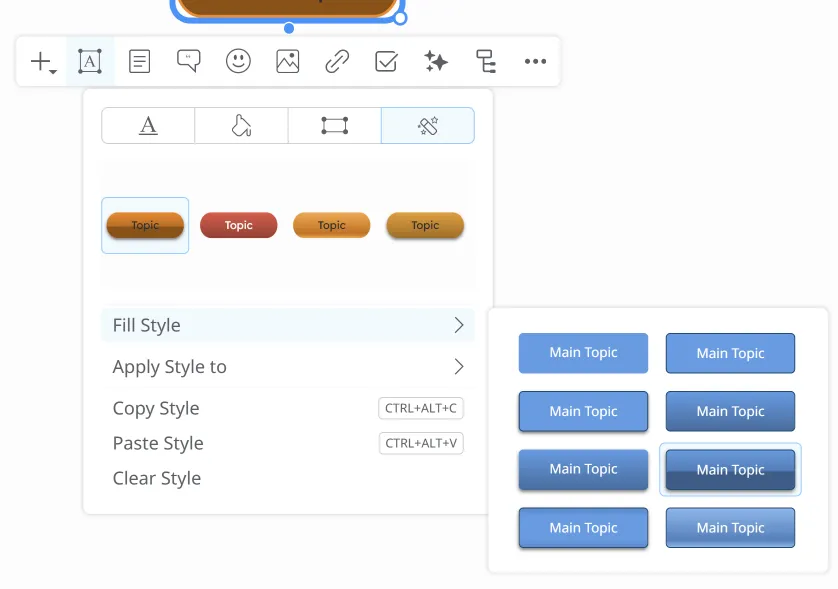
You can choose from various styles: with or without gradient, with or without border.
Applying predefined topic styles
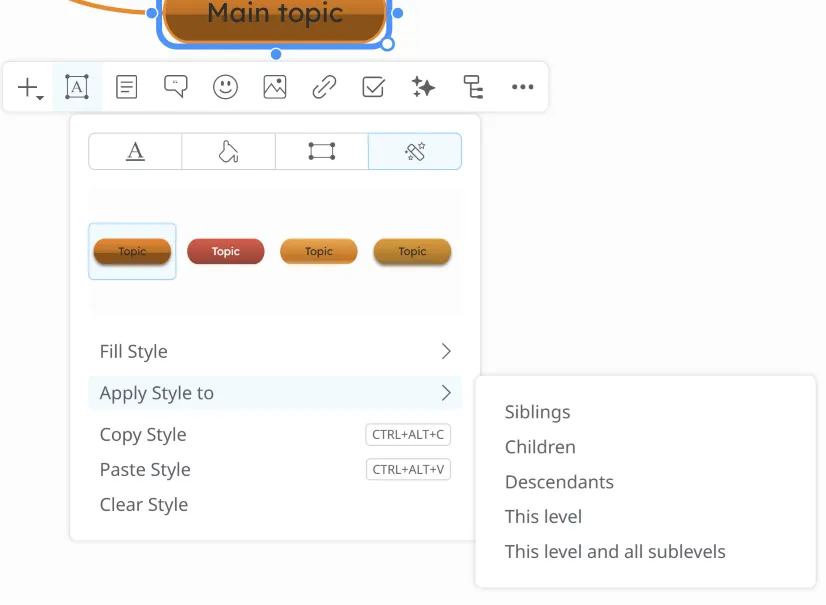
You can apply these styles easily with one click, from the bottom of the panel, to:
- the current topic’s siblings
- the current topic’s children
- all topic descendants
- all topic from this level
- all topics from this level and sublevels
You also have the options to Copy, Paste, or Clear the topic’s style.
Add Notes
Section titled “Add Notes”To add more detailed text to a topic, select it and click the Notes button on the toolbar. A popup will appear just below the menu, allowing you to enter your notes.
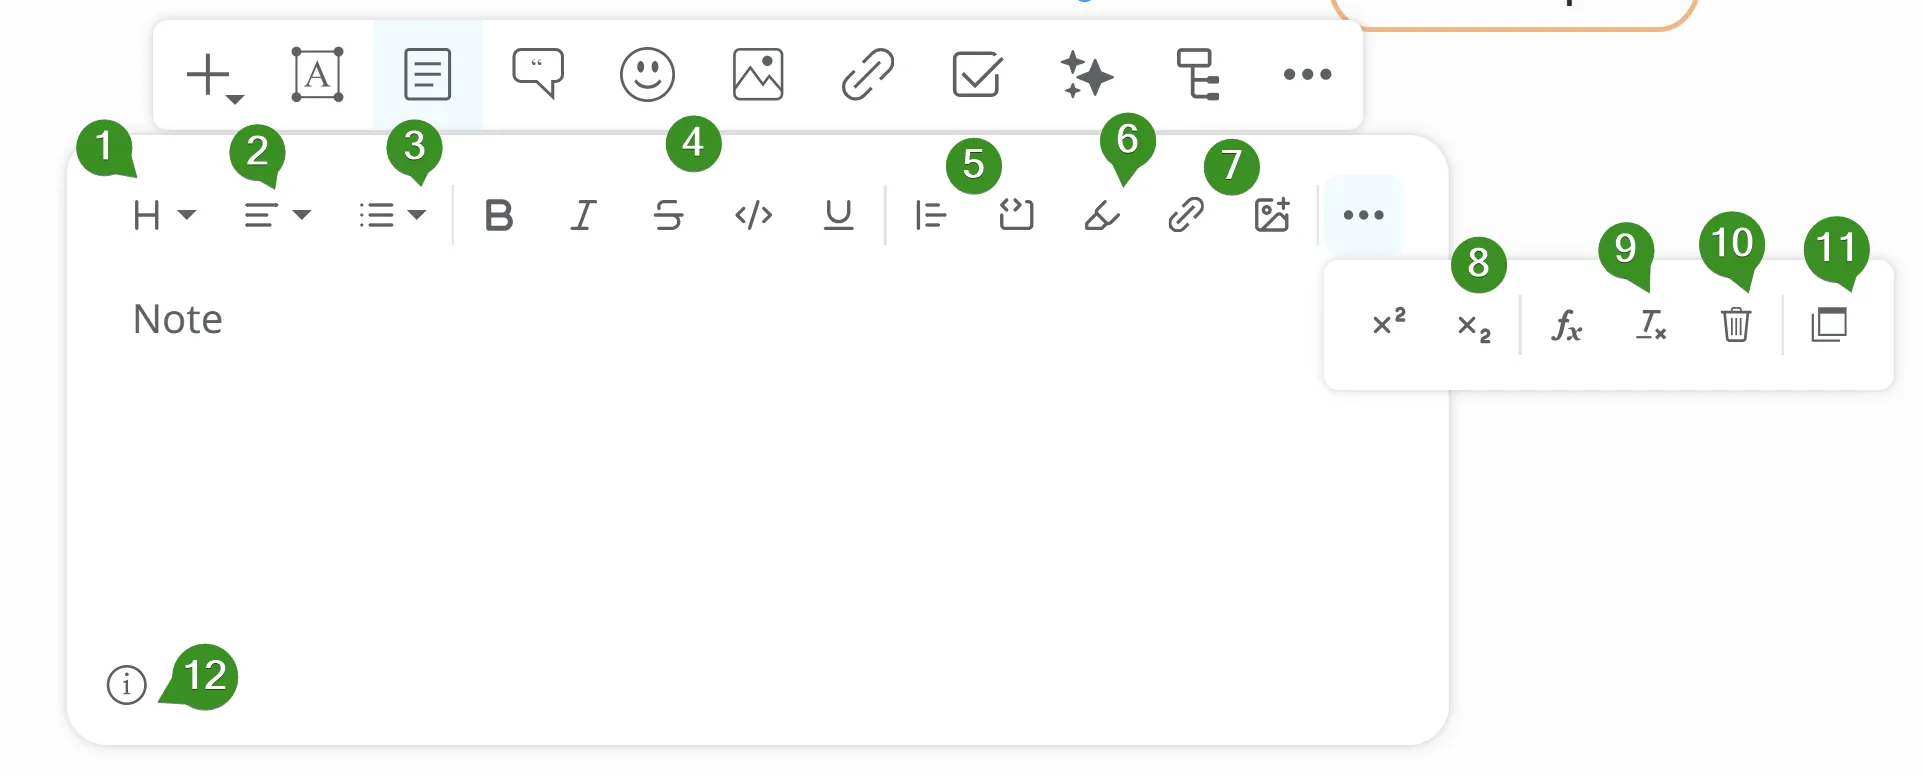
-
Headings - allows you to set the size of the text
-
Set text alignment (left, center, right, or justify)
-
Add lists (bullet, ordered, or task list)
-
Format text as bold, italic, strikethrough, block, or underline
-
Add blockquotes and code blocks
-
Set text color
-
Add links and images
-
Edit formats – superscript, subscript, and math formulas
-
Remove formatting
-
Clear all
-
Move Notes Panel – Side panel, Centered Overlay, or Popup Panel(default)
-
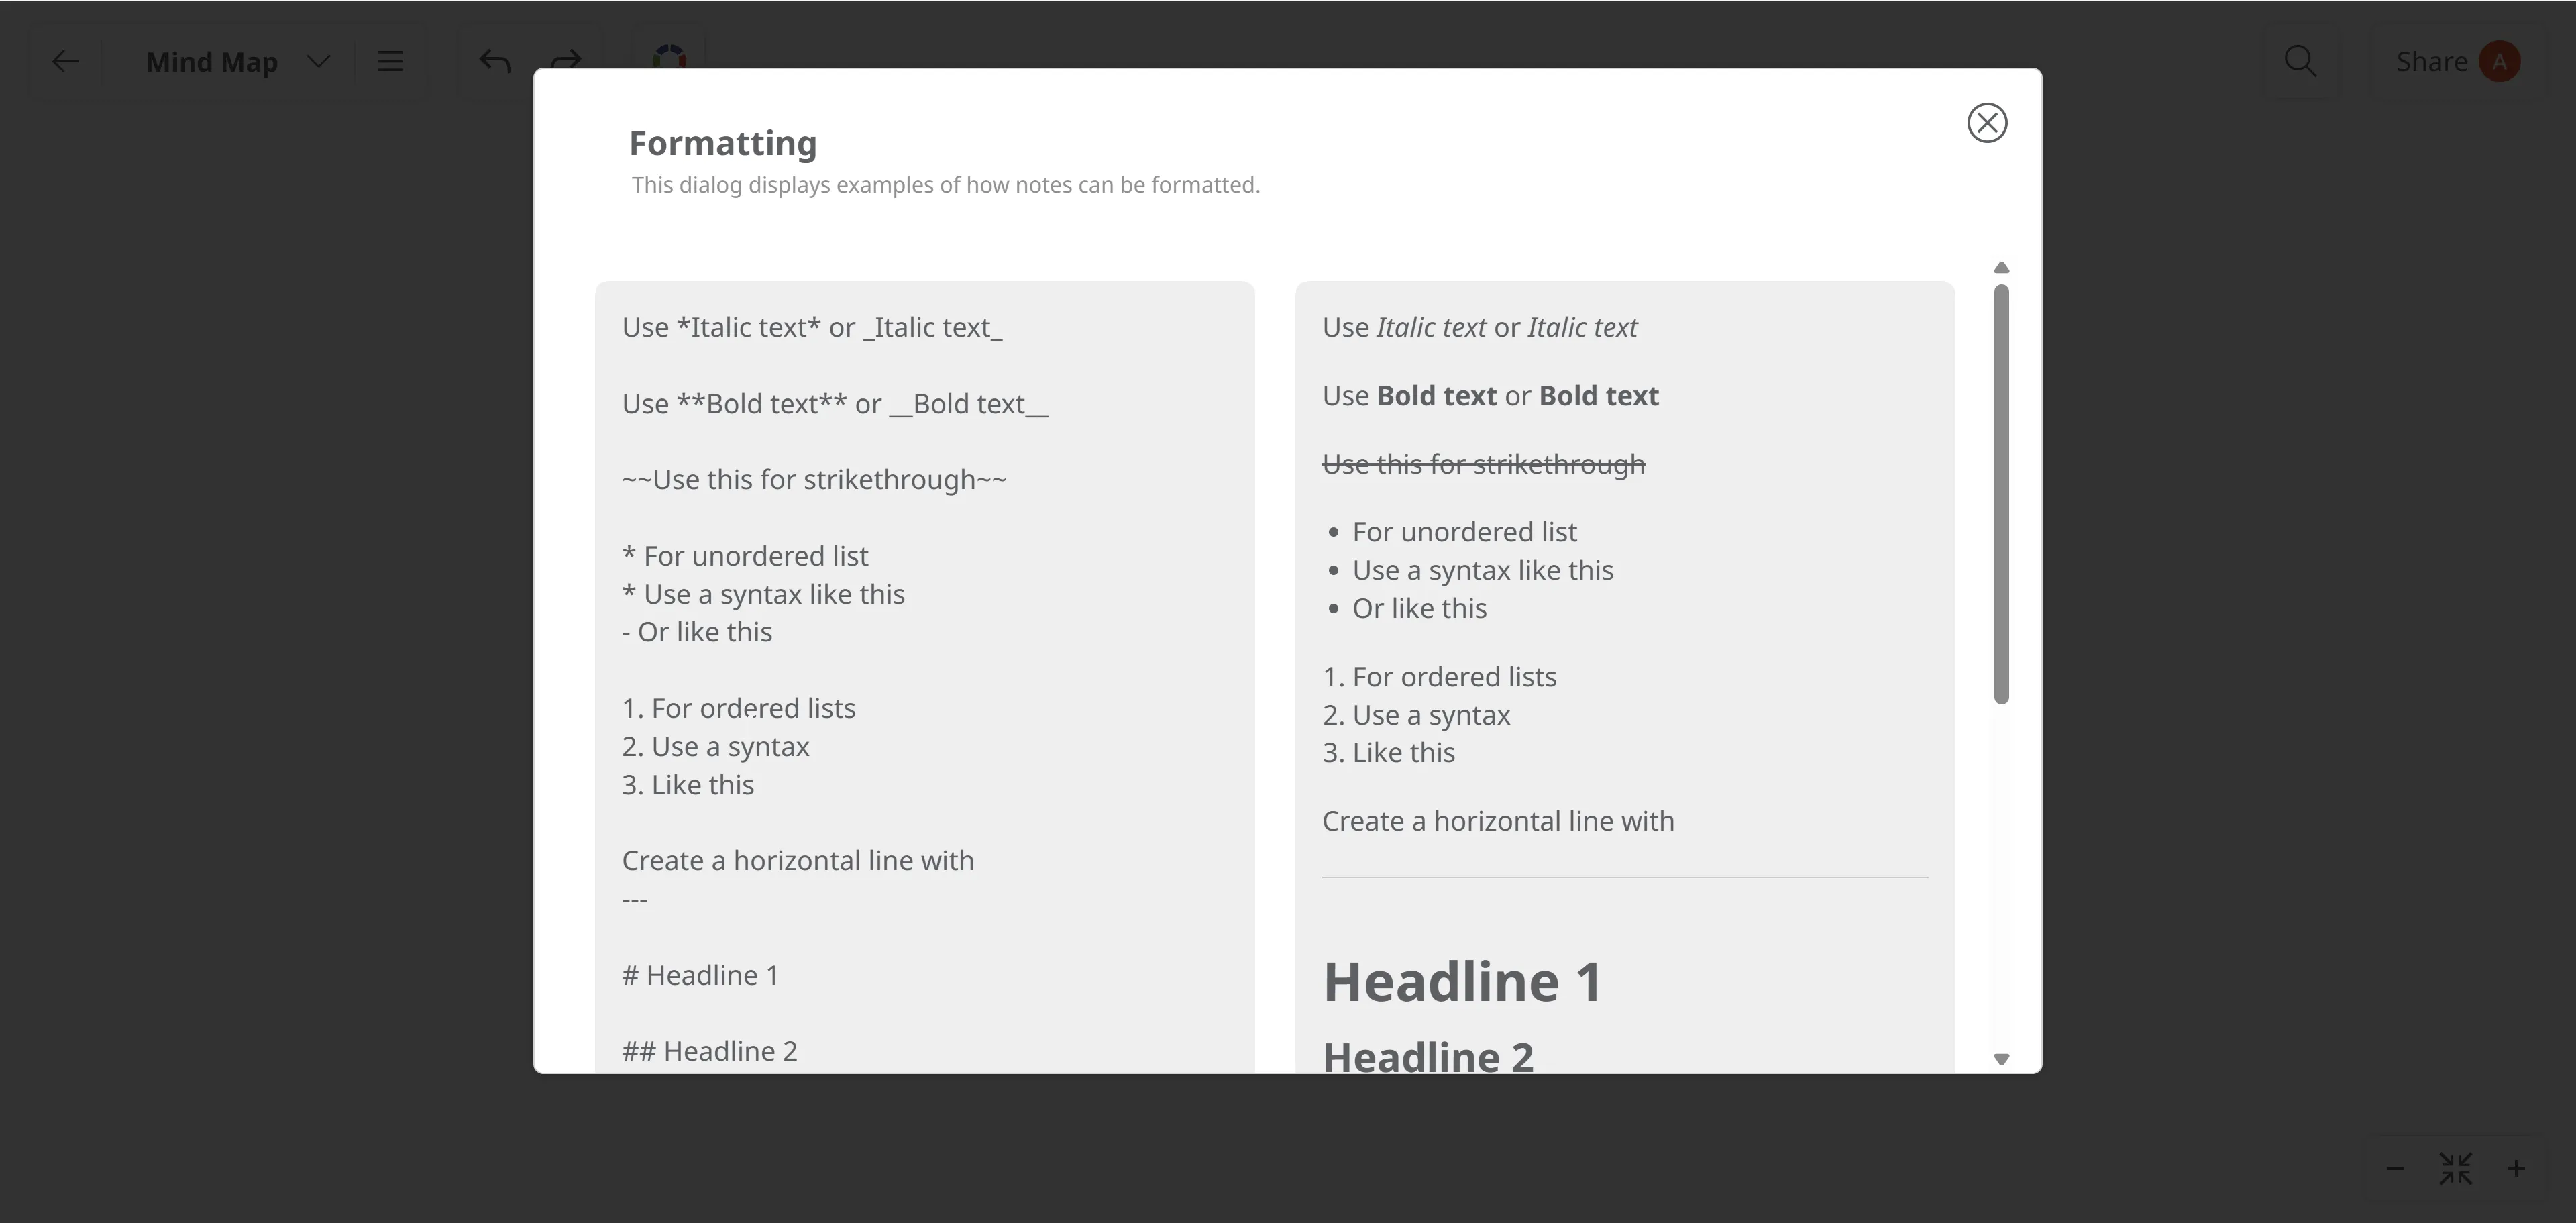
Notes Formatting Dialog – Opens a window where you can preview and edit notes formatting in real time
Add Comments
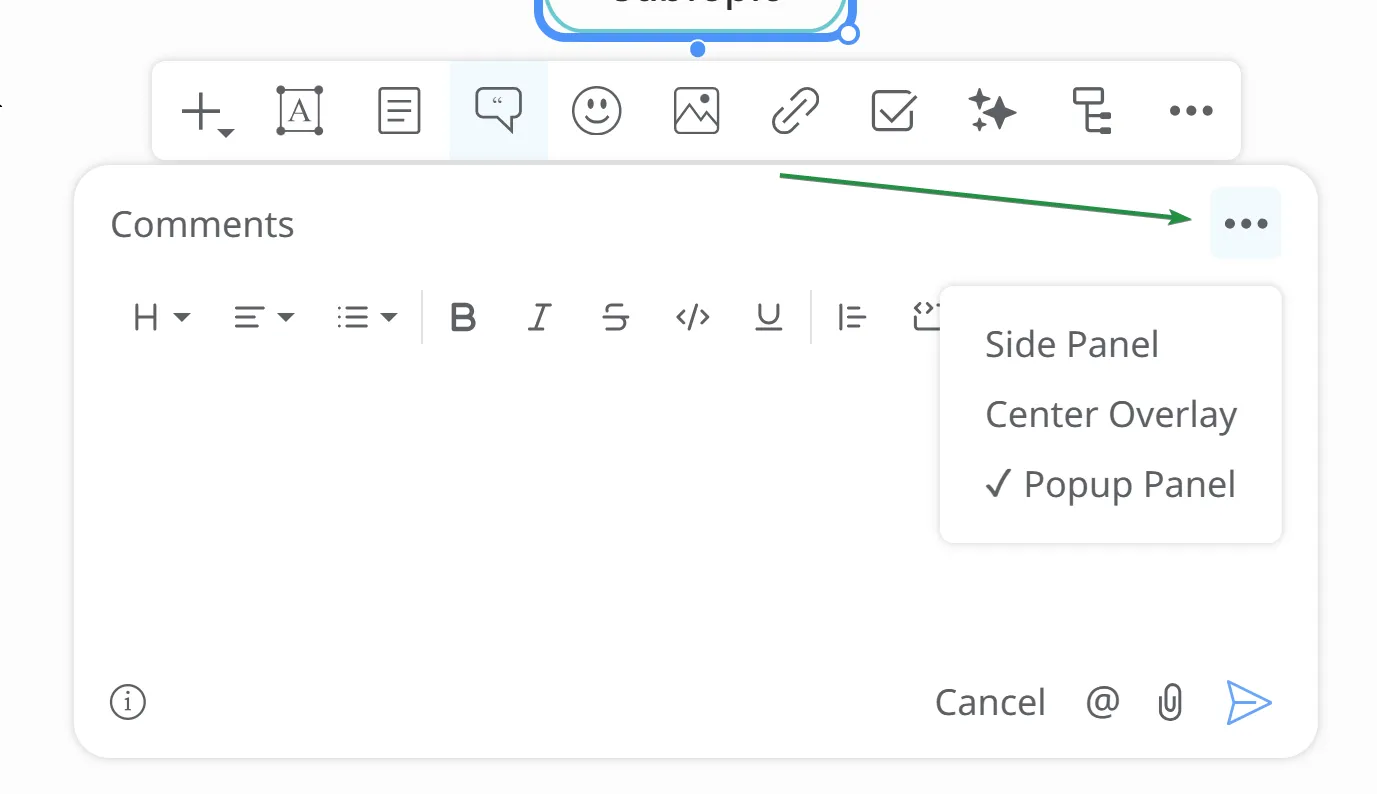
Section titled “Add Comments”To add comments to a topic, select the topic and choose the Comments icon from the toolbar. The comments panel will appear in a popup window below the menu.
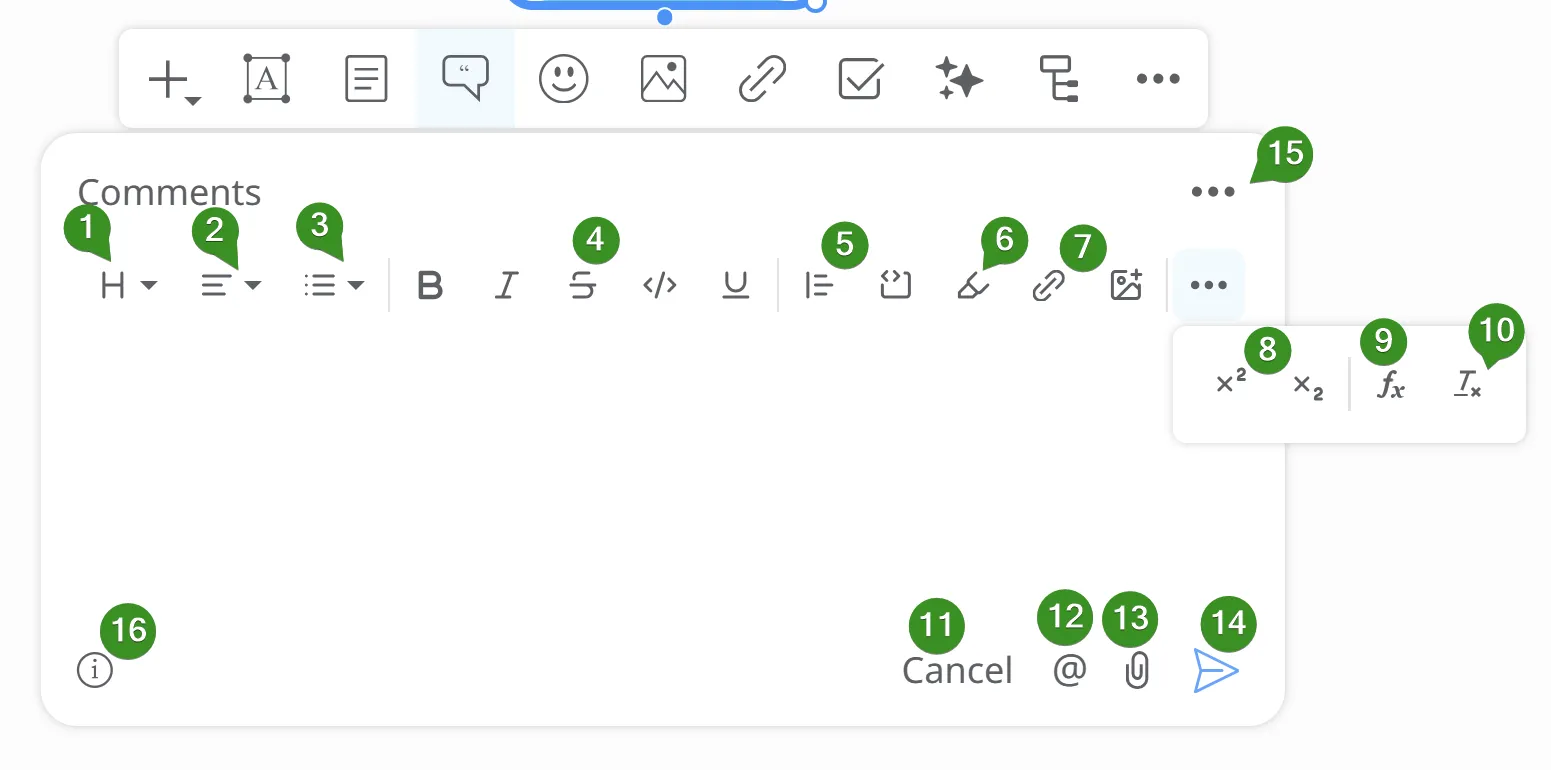
- Headings - allows you to set the size of the text
- Set text alignment - left, center, right, or justify
- Add lists - bullet, ordered, or task list
- Format text as bold, italic, strikethrough, block, or underline
- Add blockquotes and code blocks
- Set text color
- Add links and images
- Edit formats – superscript, subscript, and math formulas
- Add math formulas
- Remove formatting
- Cancel - Discard changes and close
- Mention people - You can add mentions in the comments by using the ”@” sign, followed by the name of the person you want to mention.
- Attach files
- Save Comment
- Move panel - Side Panel, Center Overlay, Popup Panel(default)
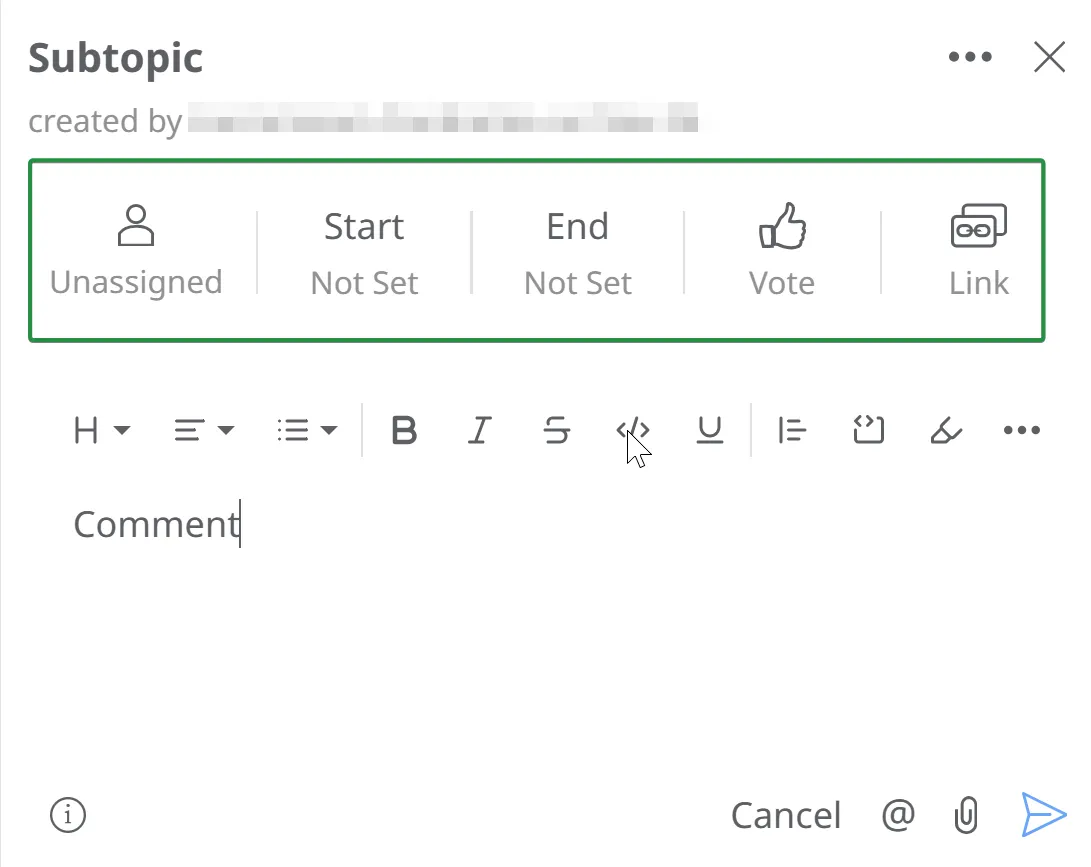
- Comments formatting dialog - Opens a window where you can preview and edit comments formatting in real time
Hyperlinks from Notes and Comments
When adding a hyperlink to a Comment or in the Notes section of a topic, you can choose whether this hyperlink is displayed, the same way as if it was a hyperlink which is directly attached to the topic itself. You can change this option for individual mind maps or for your entire account.
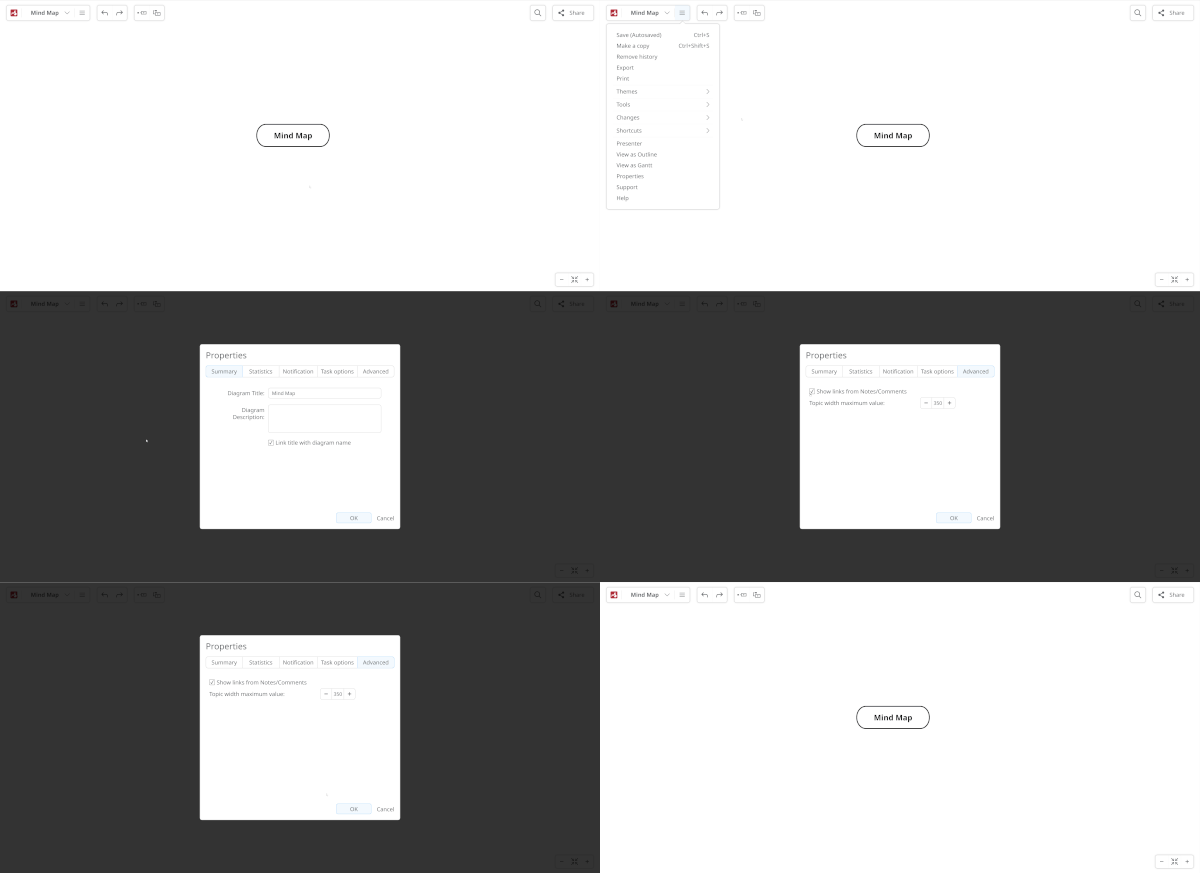
To change this option for an individual mind map, open the File List Menu, click on Properties, and go to the Advanced tab. From here, you can check or uncheck this option.
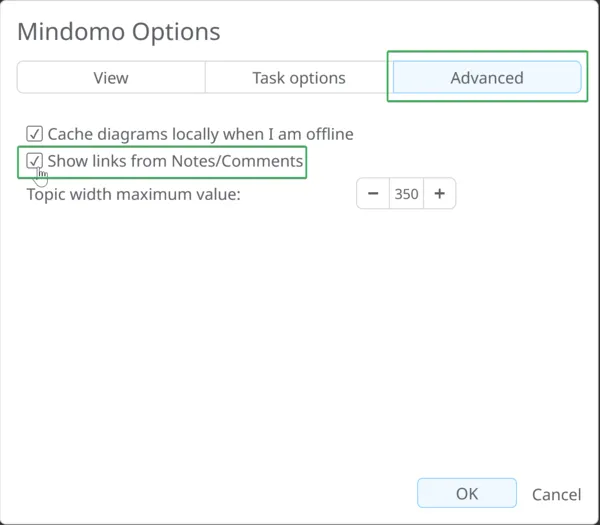
To change this option for your account, go to your Dashboard, click on the icon displaying your initials or photo, and go to the Options menu. Here, select the Advanced tab, where you can check or un-check this option.
Add Icons and Emojis
Section titled “Add Icons and Emojis”To insert icons or emojis, select a topic and click the Icons button in the toolbar.
![]()
By default, the icons will be inserted at the beginning of the text/word in a topic.
Click the icon to open the context menu. Here you can remove it, or add other icons from your frequently used list.
For Windows, select the topic/subtopic, press the Windows button, and hold the Dot key to open the emoji panel.
![]()
For Mac, select the topic/subtopic and use the keyboard shortcut Command-Control-Spacebar to access the emoji panel.
Add Multimedia
Section titled “Add Multimedia”To add multimedia to a topic, select the topic and click the Multimedia button on the toolbar. You can add images, videos, audio files or record your speech.
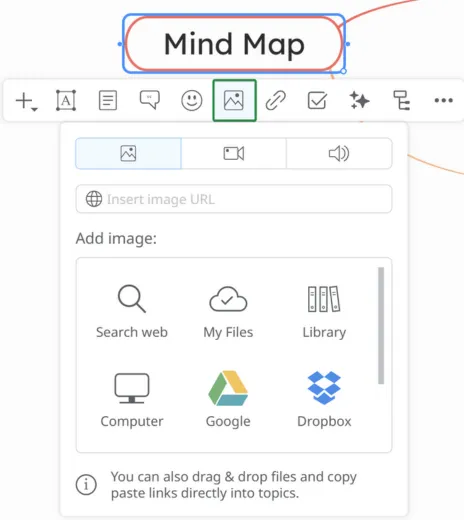
1. Add Images to topics
There are several ways to add images to a topic:
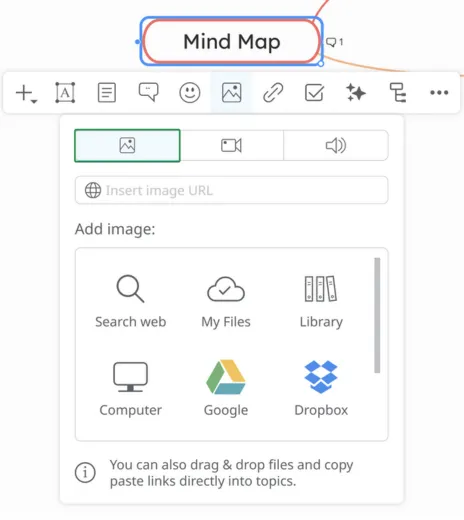
- Insert image URL
- Search images on the Internet
- Attach uploaded files
- From Mindomo library
- Upload from your Computer, Google Drive, Dropbox, or OneDrive
2. Add videos to a topic
There are several ways to add videos to a topic:
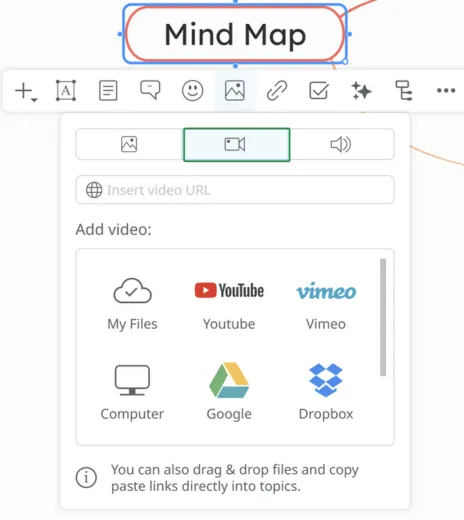
- Insert video URL
- Attach uploaded files
- Search YouTube Video
- Search Vimeo Video
- Upload from Computer, Google Drive, Dropbox, or OneDrive
3. Add audio files or record your speech
There are several ways to add audio files to a topic:
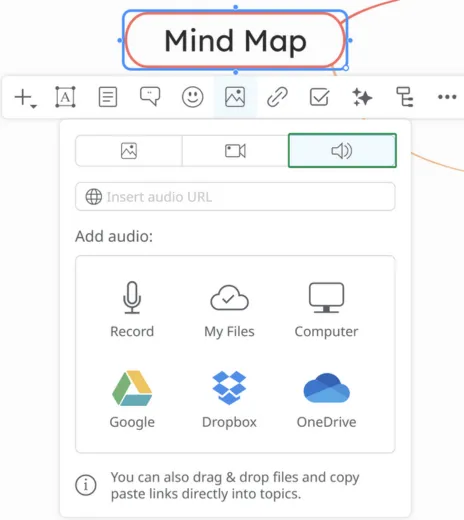
- Insert audio URL
- Record Audio
- Attach uploaded files
- Upload from Computer, Google Drive, Dropbox or OneDrive
Boundaries
Section titled “Boundaries”The Boundary functionality will help you mark and determine the limits of an area on your map. You can apply boundaries to any topic but the central one.
Use the handlers to easily include other topics/branches in the boundary.
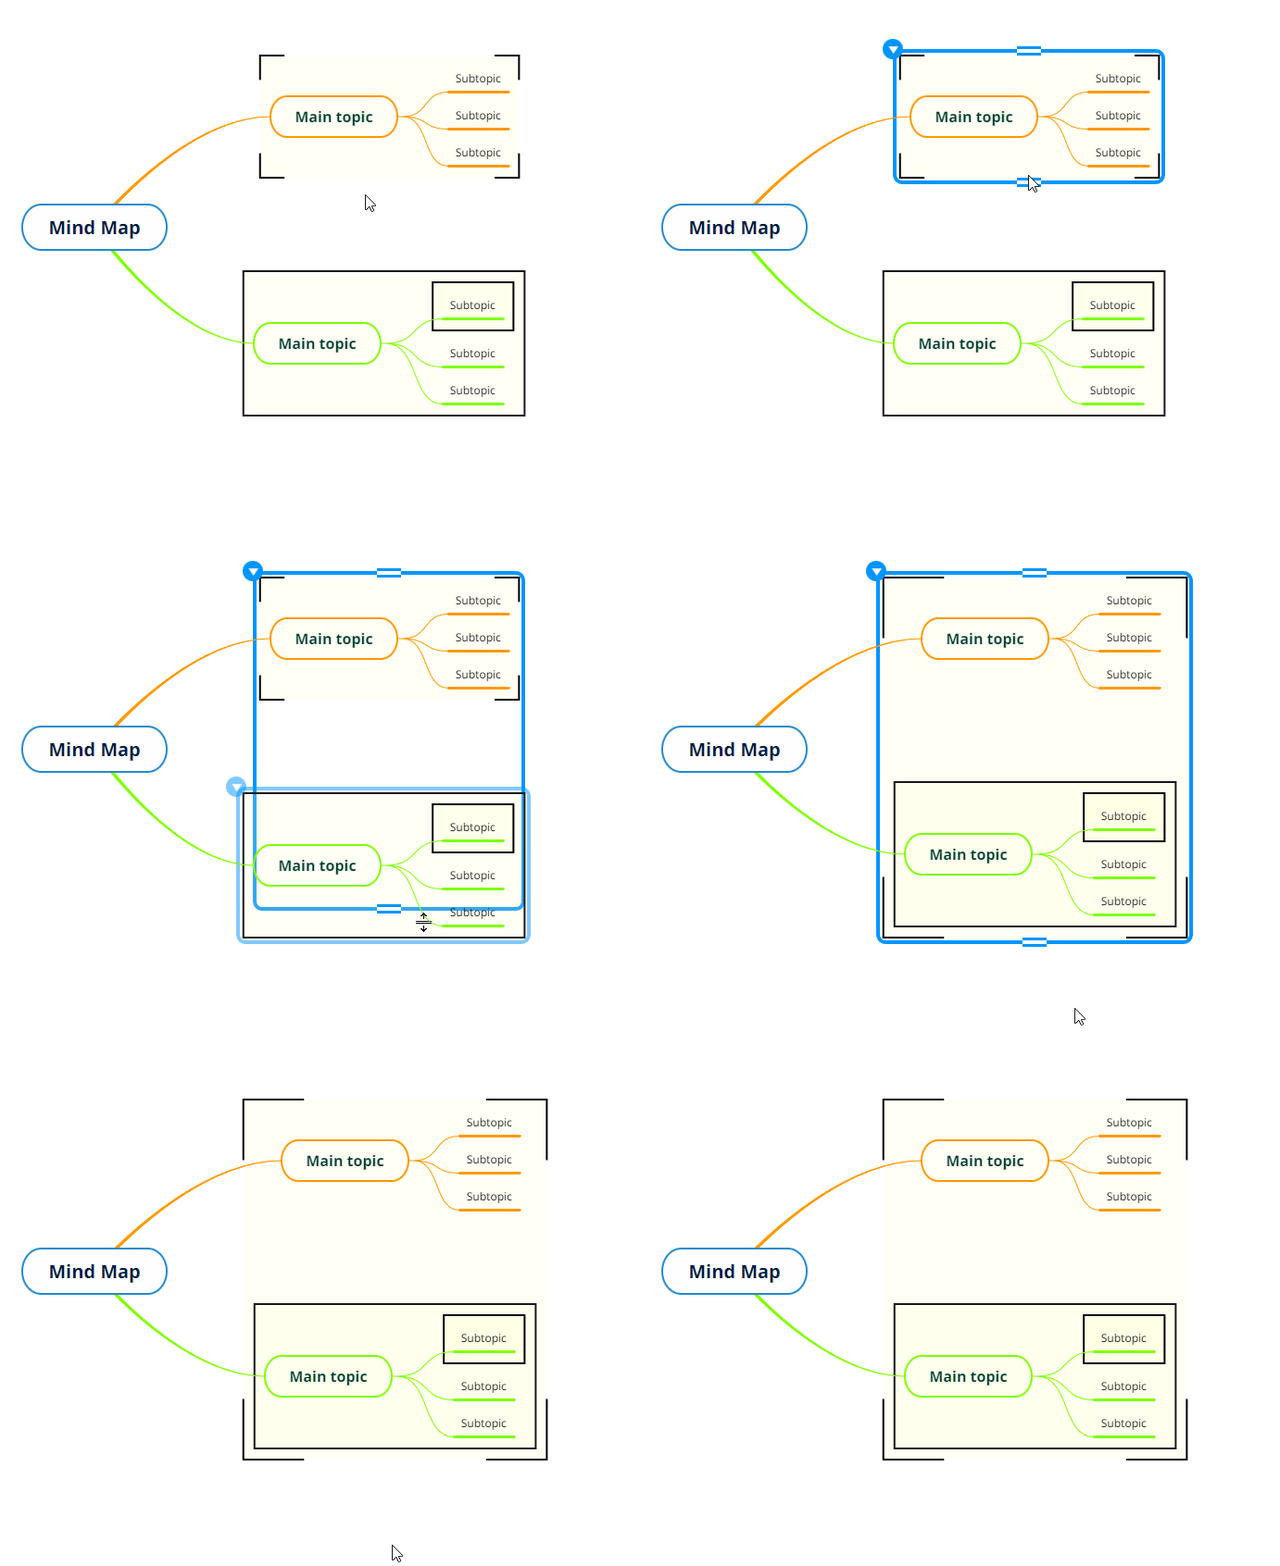
You can add a boundary around a floating topic and is also possible to add a boundary within another boundary.
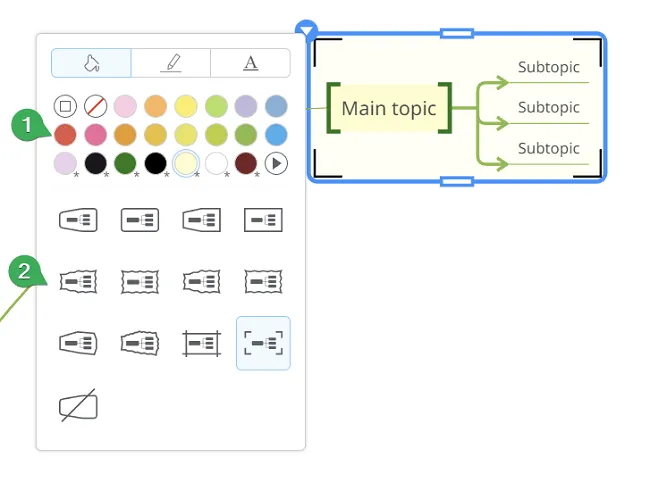
To customize the boundary, access its context menu. In the first tab you can select the fill color (1) and the boundary type (2).
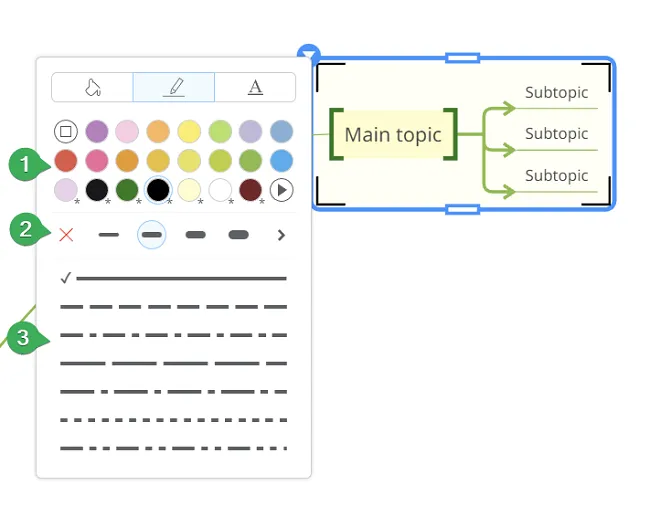
From the second tab you can set the boundary’s border color (1), line weight(2), and pattern(3).
To add a label on the boundary, select it, click on the context menu, and then access the 3rd tab. If you set a boundary type that is not suitable for adding a label, it will ask you to change the type first.
Add Summary
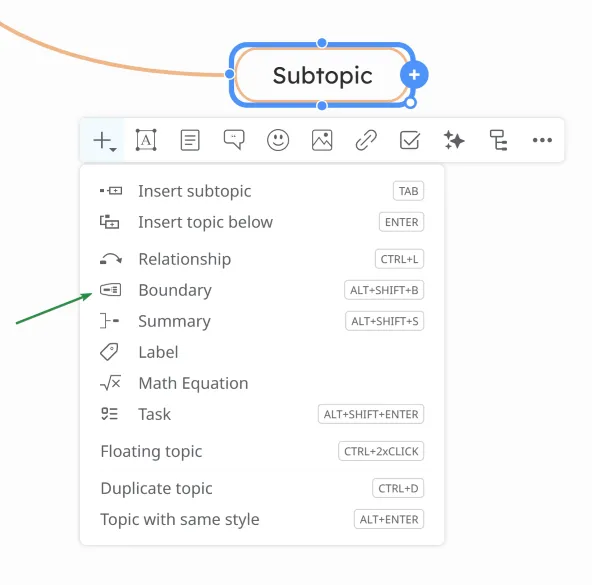
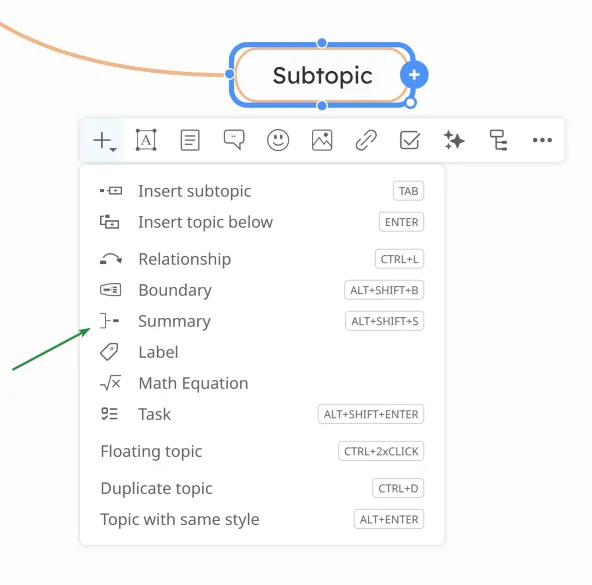
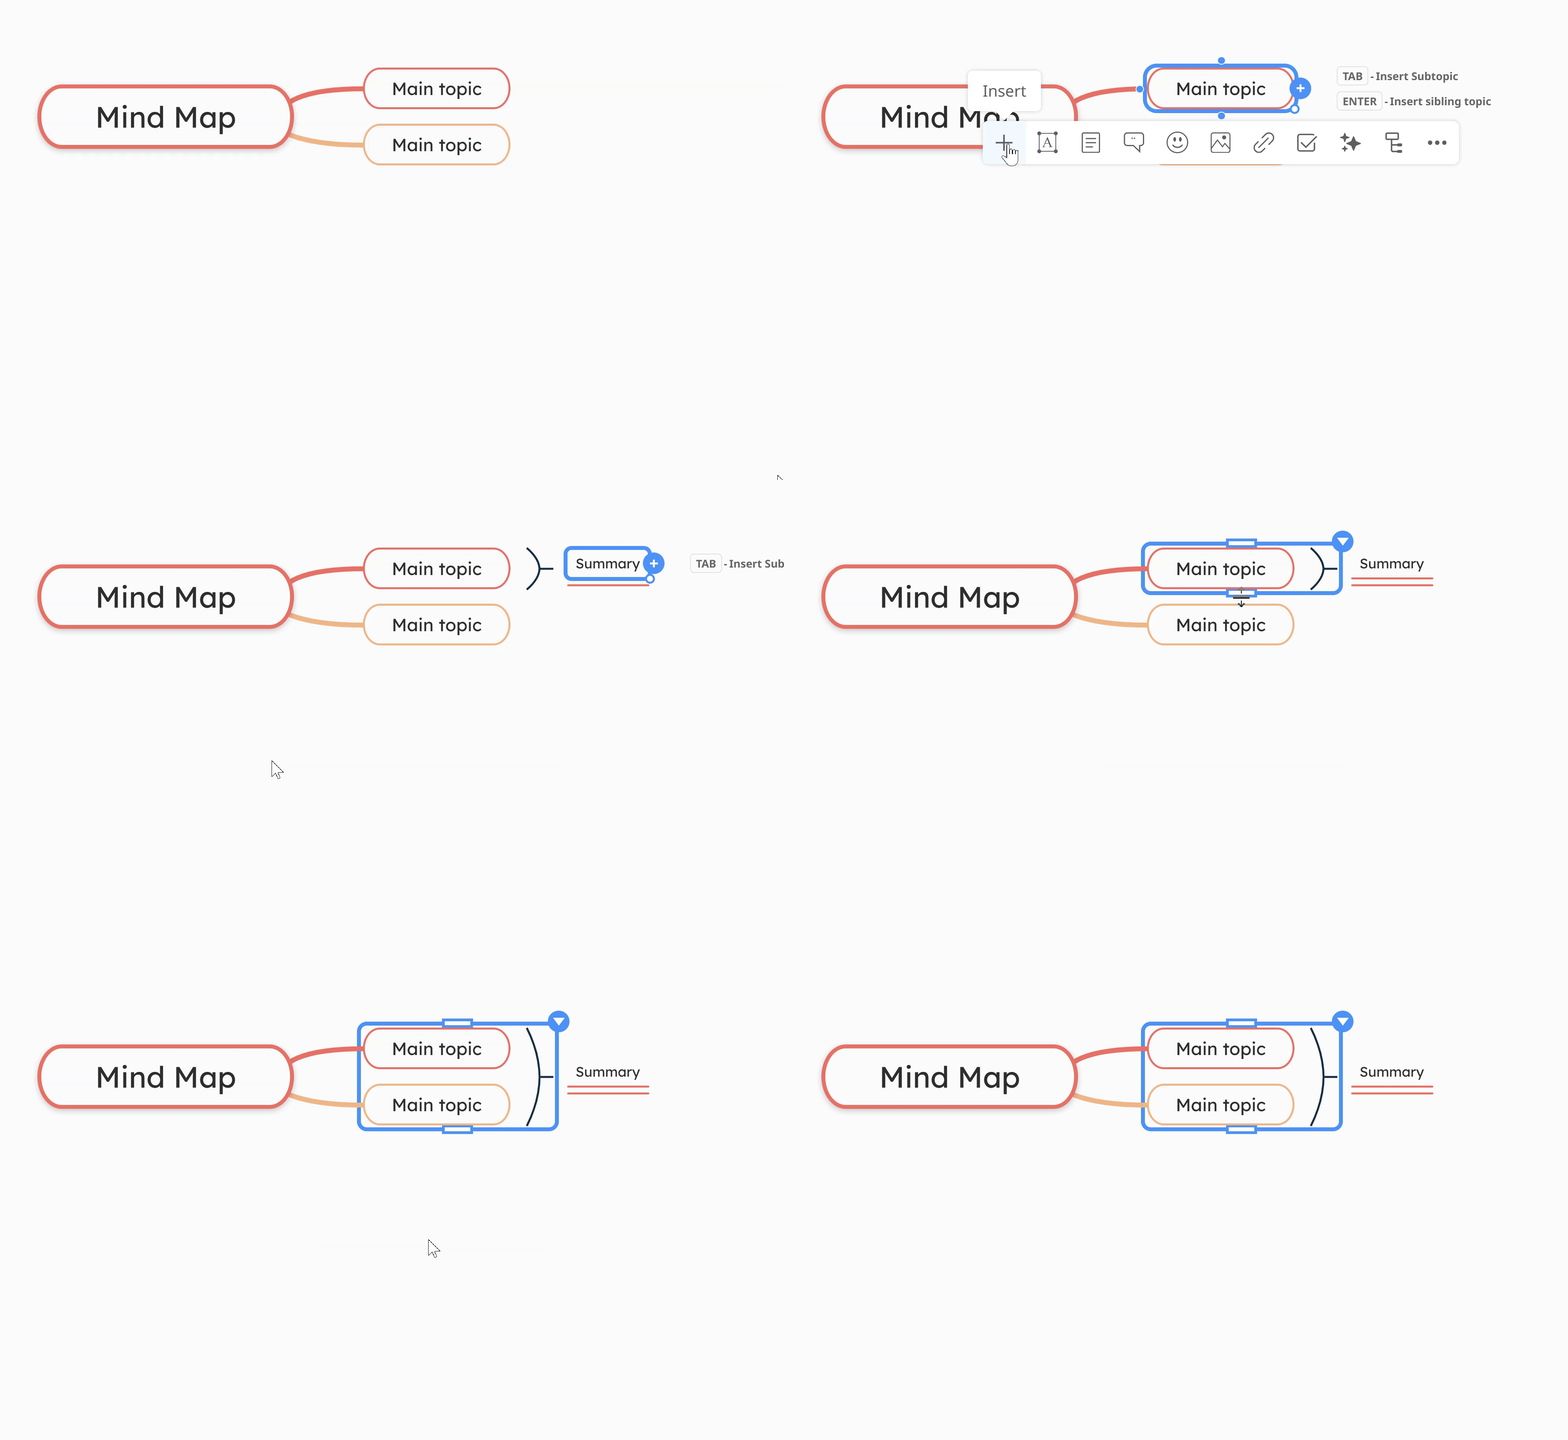
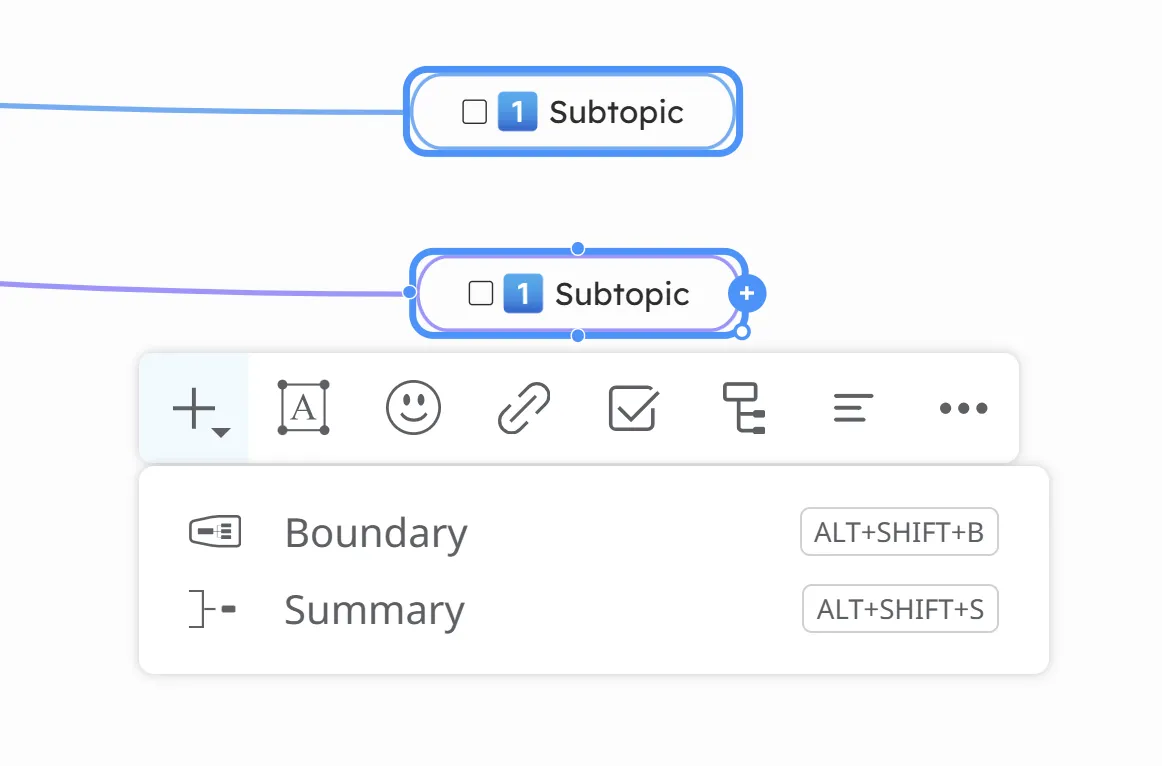
Section titled “Add Summary”To insert a summary, select a topic, click the ” + ” button on the toolbar, and then choose the Summary option from the menu. You can add a summary to any topic except the central one.
Use the handles to easily include other topics/branch in the summary.
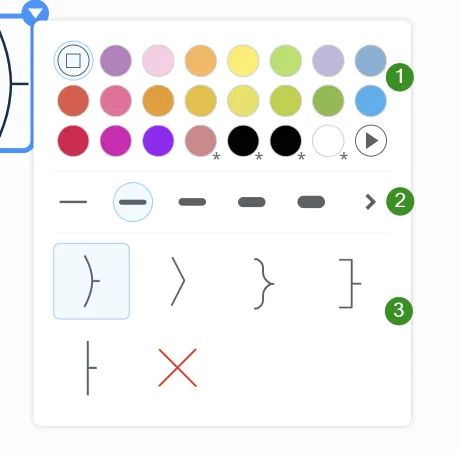
To costumize the summary, click its context menu:
-
Color of the summary
-
Weight of the summary
-
Type of the summary
Add Label
Section titled “Add Label”To add a label, select a topic, then click the ”+” button on the toolbar and choose Label from the menu. The label will be applied to the selected topic and can later be used for searching.
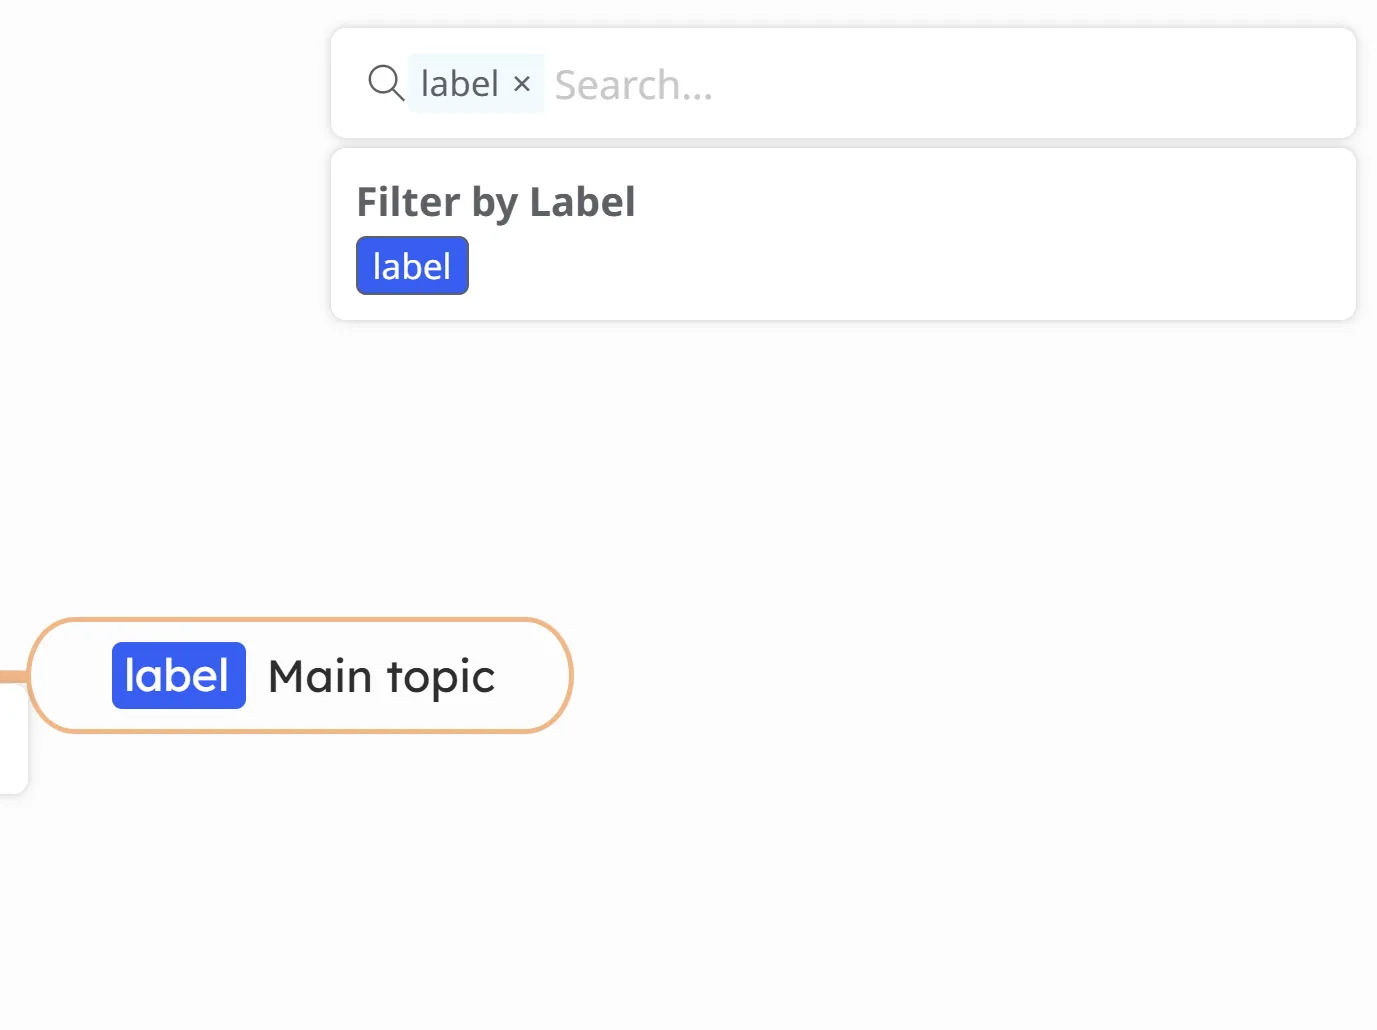
Math Equation
Section titled “Math Equation”To add a Math Equation to a topic, first select the topic, then click the ”+” button from the toolbar.
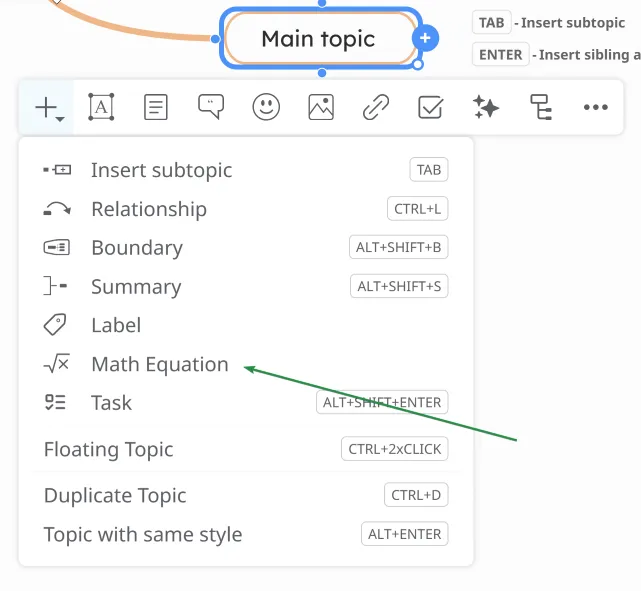
When you click the Math Equation button, a default formula is added to the topic. After saving, Mindomo displays the formula directly within the topic using the KaTeX syntax. For more information, see Math Formulas.
Add Relationship
Section titled “Add Relationship”The option to add a relationship between topics will be available when you select a topic and click the ” + ” button from the toolbar.
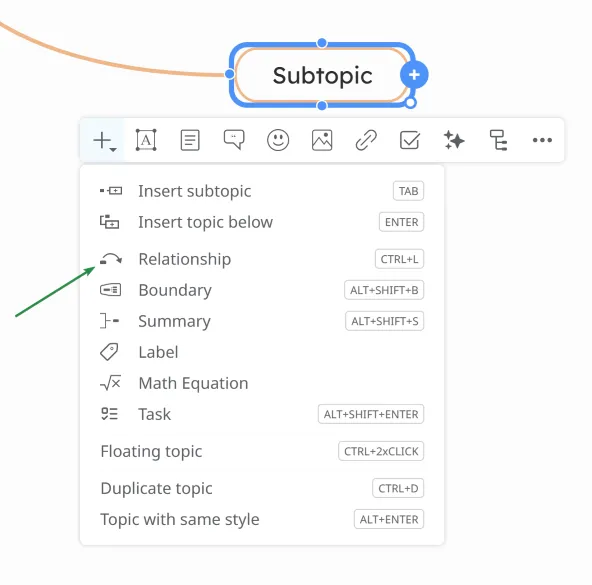
To create a relationship between two topics, click the Relationship option and drag the line to the other topic. You can then add a label on the relationship.
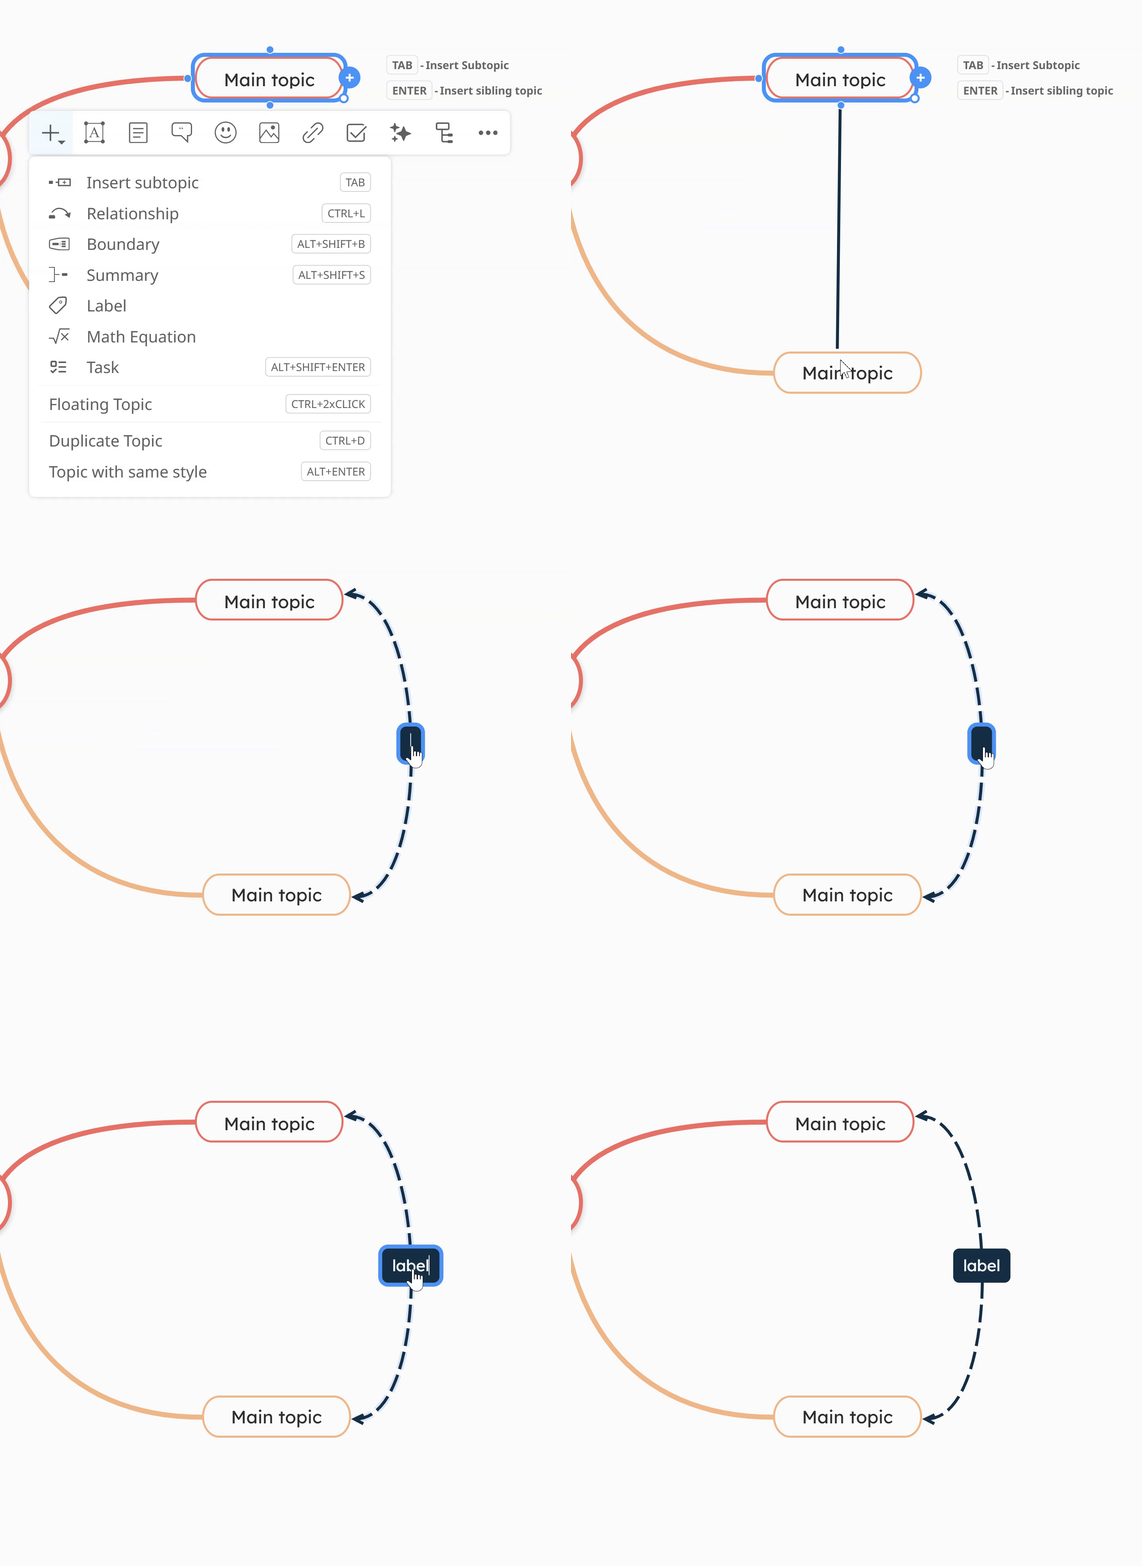
To customize the relationship, open its context menu:
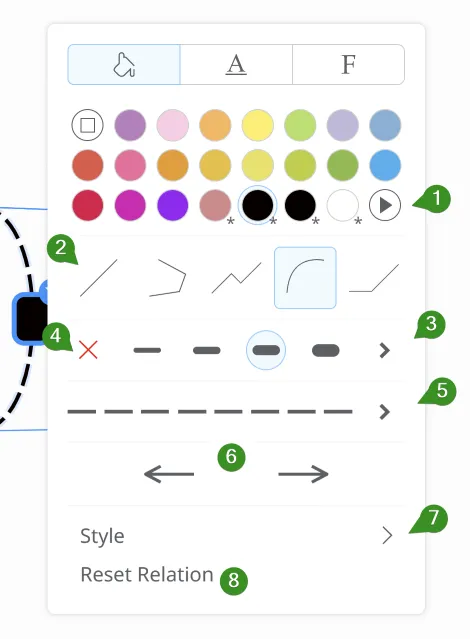
- Relationship’s Color
- Relationship’s shape
- Relationship’s weight
- Remove relationship
- Relationship’s pattern
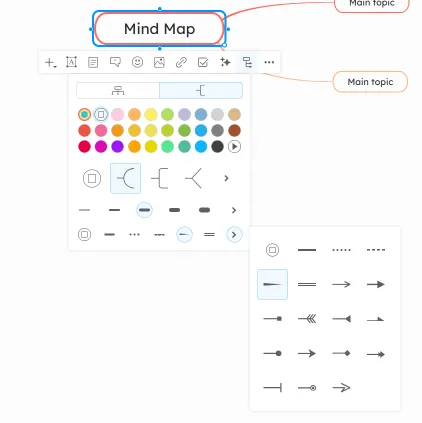
- Relationship’s line endings - we introduced new line endings for both Left and Right endings
- Style - copy style or set it as default for current map
- Reset relationship
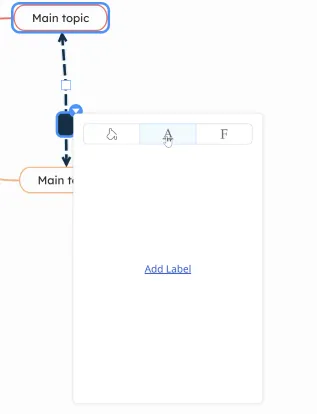
To add, delete, or customize the label on a relationship, select it, open the context menu, and then go to the second or third tab. You can adjust the color, size, alignment, or font.
Links and Attachments
Section titled “Links and Attachments”Select a topic and click the Links/Attachments button from the toolbar.
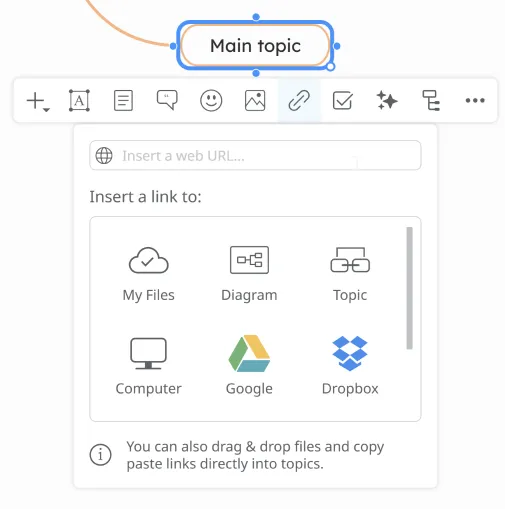
We have several options for attaching files and adding links:
- Weblink - insert a link
- Link to Uploaded File - use a document already uploaded on your account
- Link to Diagram - link to another map
- Link to Topic - link to a topic in the map
- Upload from - select from multiple options to upload a new document to the mind map (from Computer, Google Drive, Dropbox, OneDrive)
Smart tools
Section titled “Smart tools”The Smart Tool in Mindomo is an AI-powered assistant designed to improve your diagrams.
1. Generate content with AI
Mindomo AI is a smart feature that helps you quickly create structured mind maps, brainstorms, and analyses from plain text, making idea organization faster and easier.
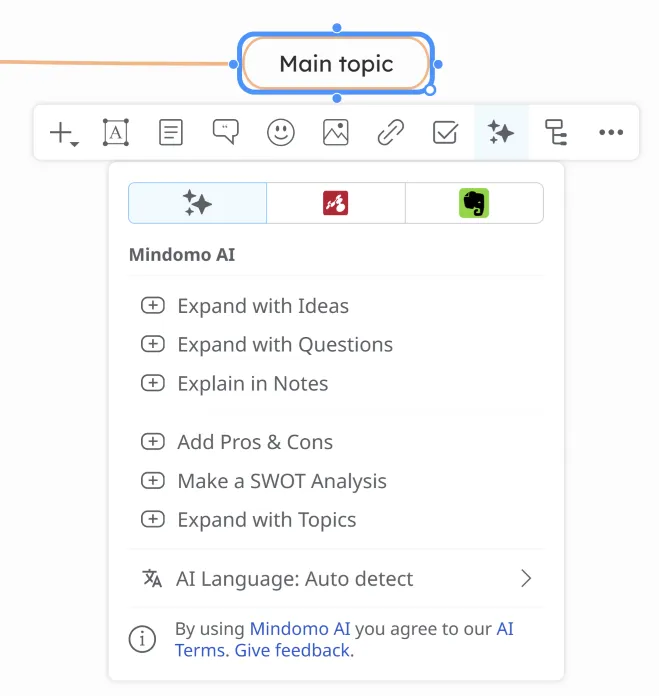
- Expand your topic with ideas or questions
- Provide explanations in the notes section
- Add Pros & Cons
- Create SWOT analyses
- Suggest related topics
- Auto language detection for multilingual input
2. Bookmarks saved with Mindomo - Browser Extension
Mindomo Bookmarks is a browser extension and integration tool that lets you save text, links, and images from web pages and send them directly into your mind maps.
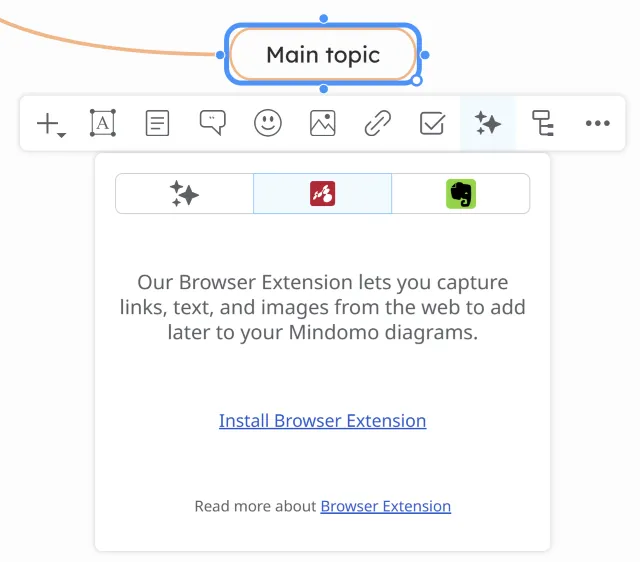
Discover the complete feature overview here: Mindomo Bookmarks
3. Bookmarks saved with Evernote
This integration lets you easily add your Evernote notes in diagrams, helping you organize and visualize your ideas better.
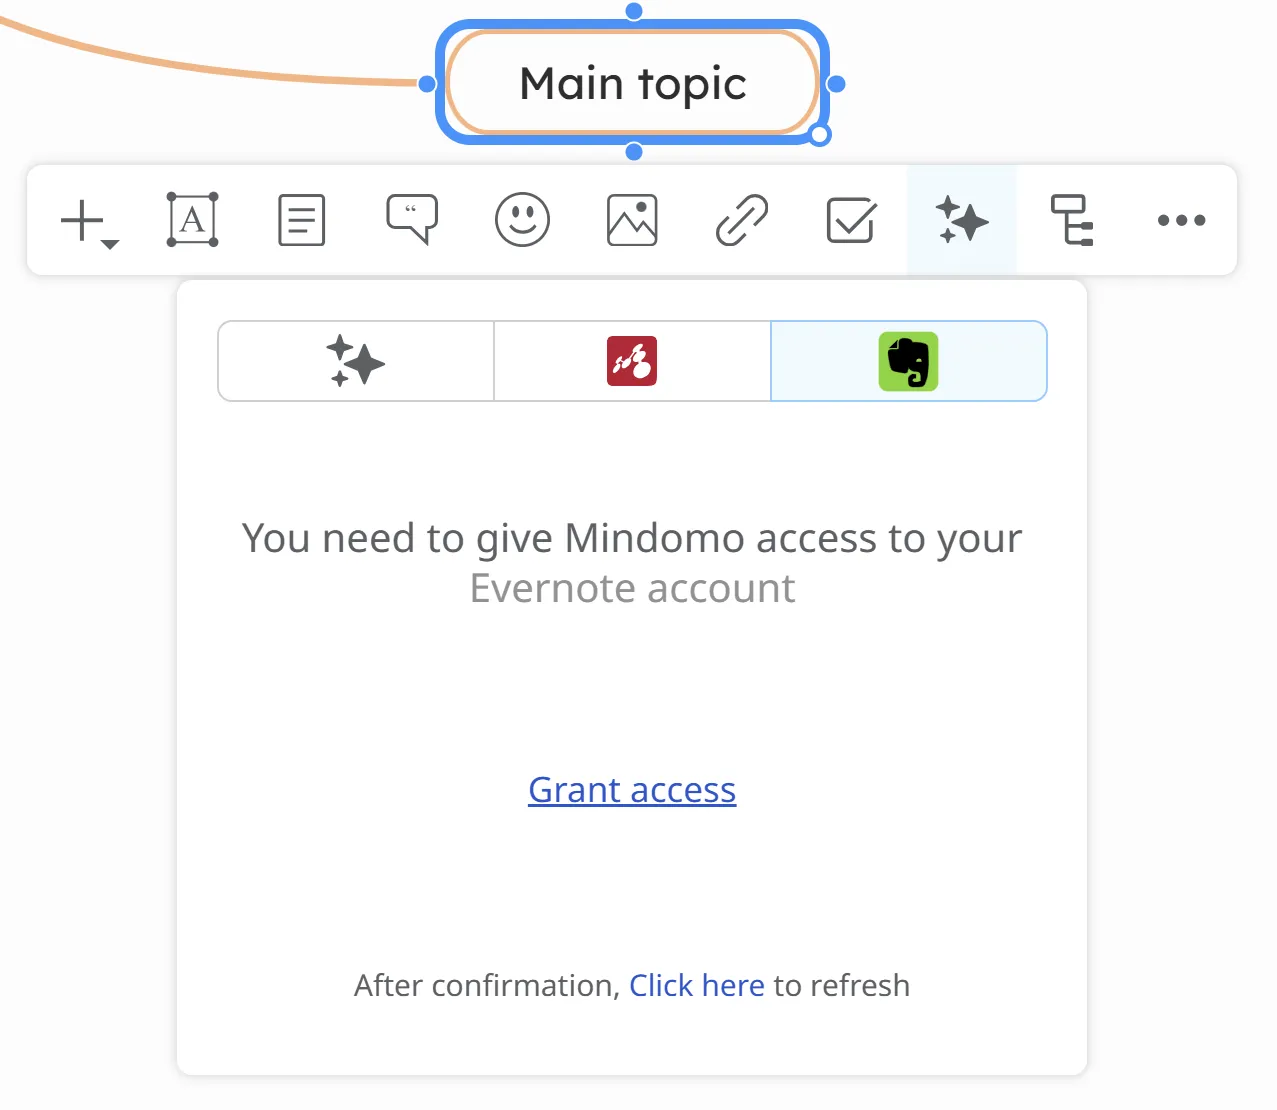
Discover the complete feature overview here: Evernote Integration
Layouts
Section titled “Layouts”This section provides various layout options to help organize the structure of your diagram.
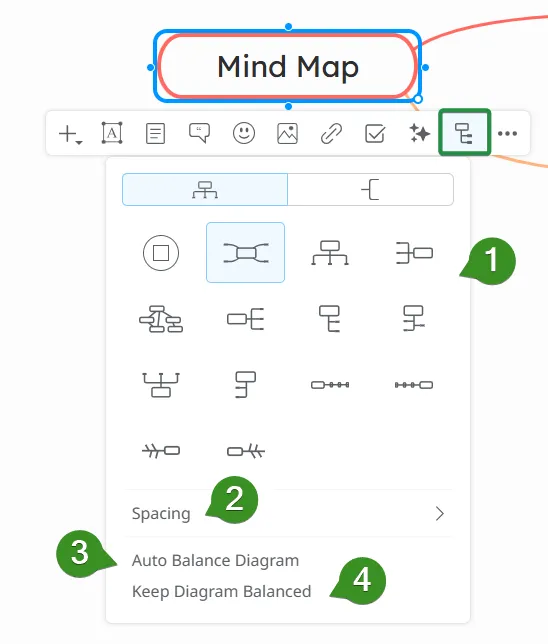
- Layouts - choose from several layout types
- Spacing - set the space between topics and branches
- Auto balance diagram - this option improves the appearance of the diagram. It can be activated from the central topic
- Keep the map balanced - ensures topics stay in the predefined layout shape
Line panel
This section allows for the customization of the map’s lines.
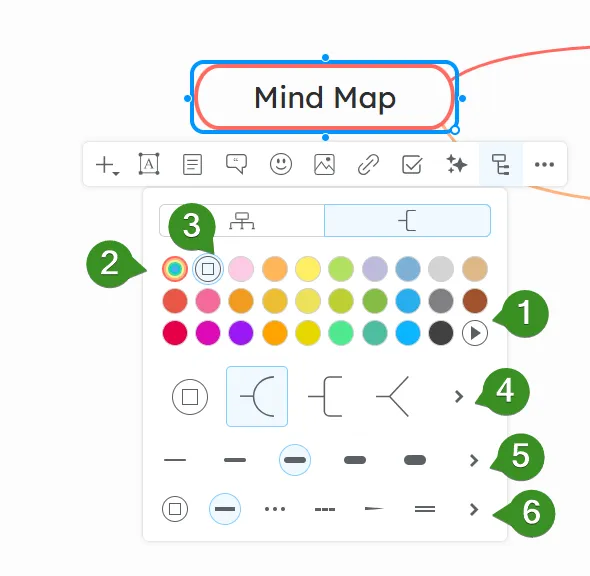
- Connection line’s color - choose from color picker
- Multicolor palettes
- Default color
- Connection types
- Weight of the connections
- Line endings
We have introduced several new line ending styles, as shown below:
Editing Actions
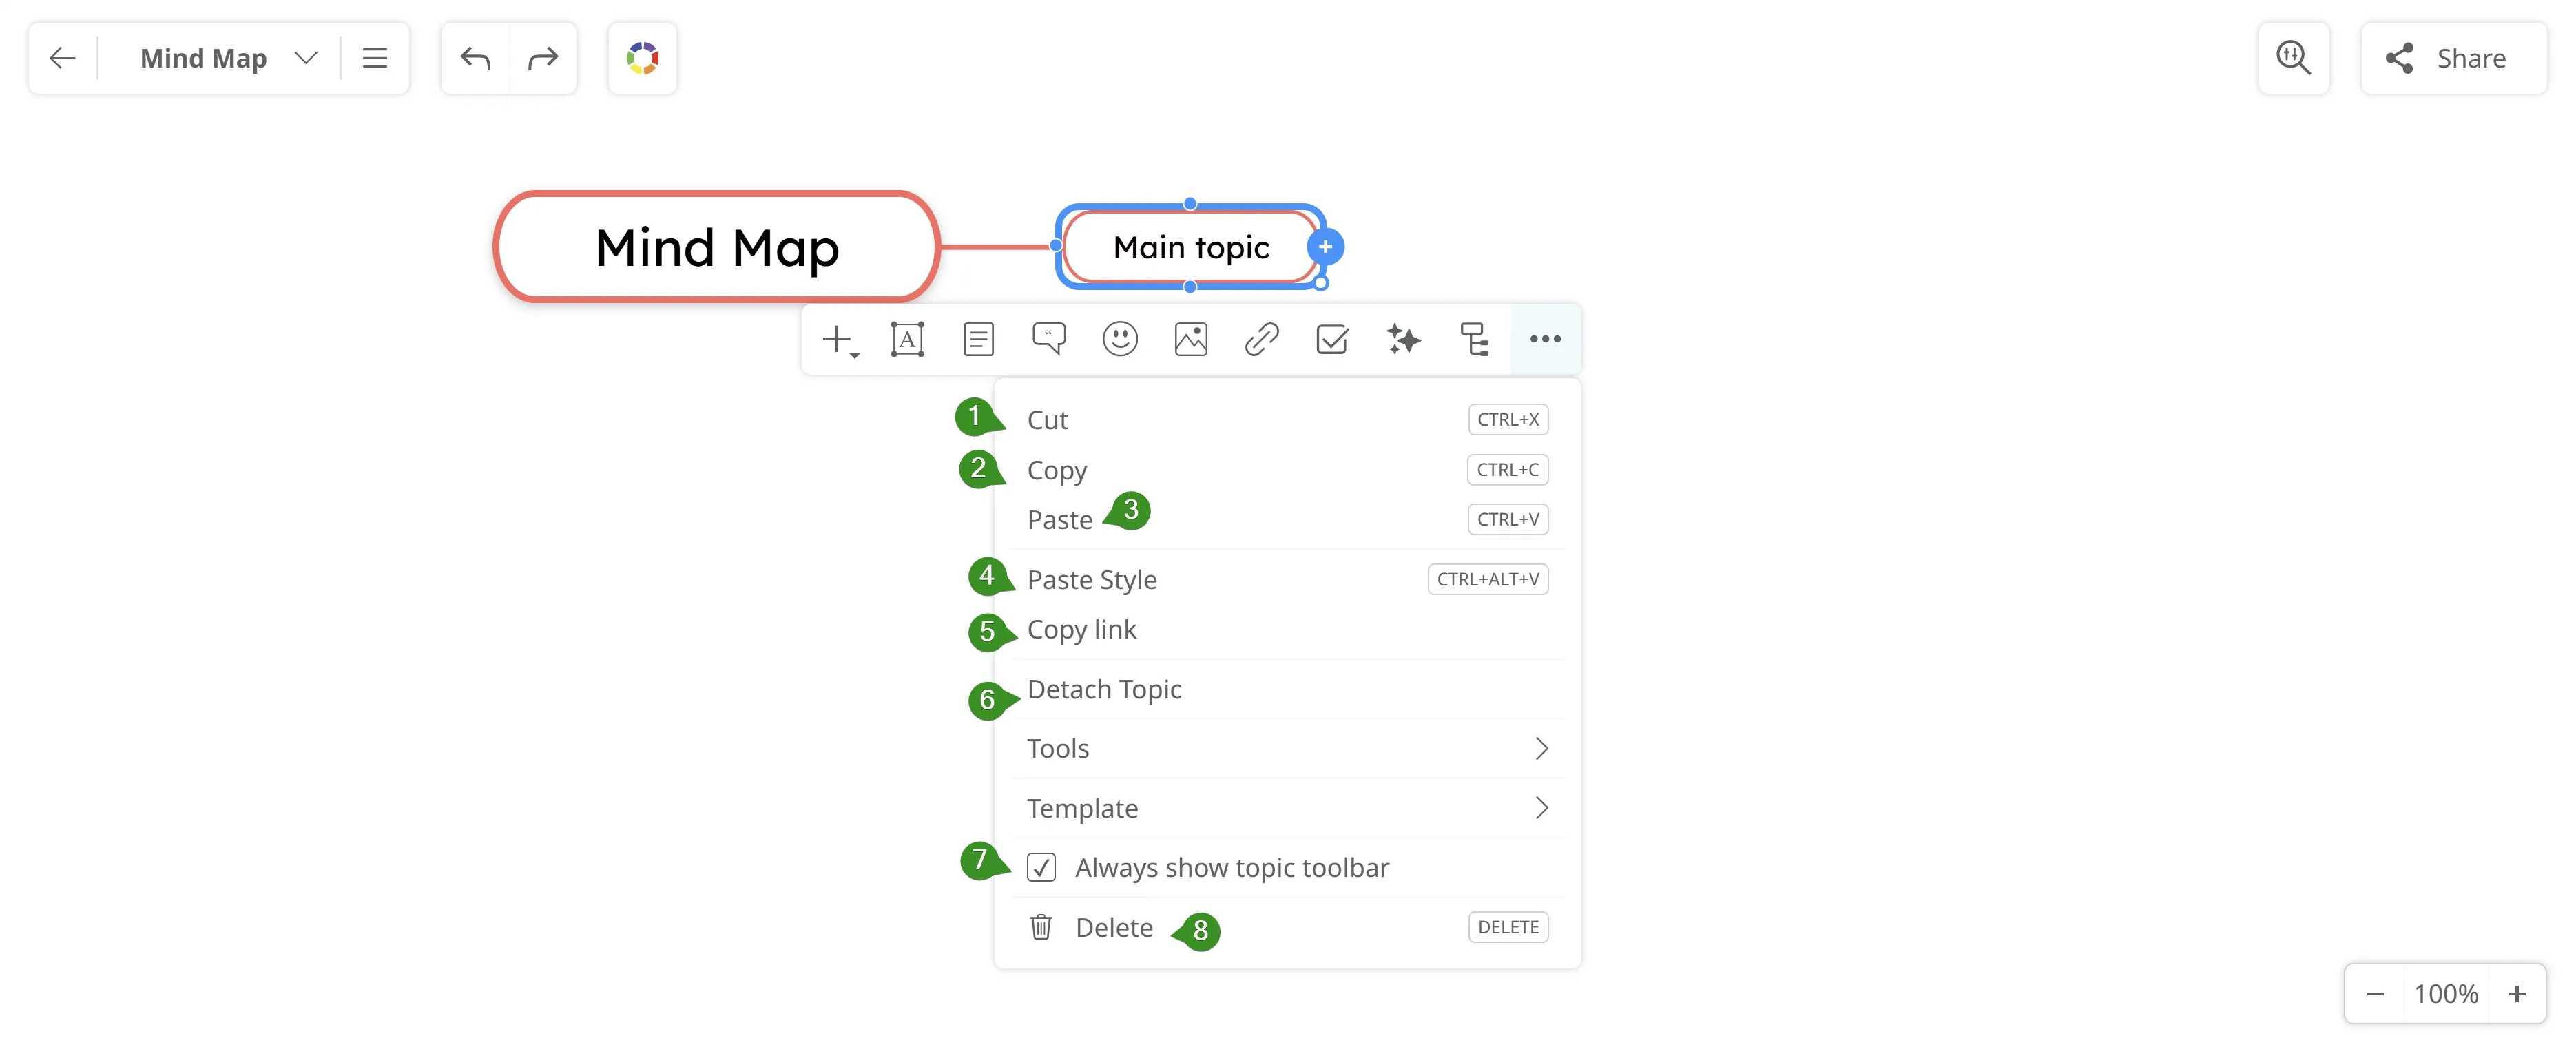
Section titled “Editing Actions”Includes basic commands for modifying content such as cutting, copying, pasting, editing or deleting topics. Select a topic and click the More button on the toolbar:
-
Cut - remove the selected topic and place it on the clipboard
-
Copy - copy the selected topic to the clipboard
-
Paste - insert topic from the clipboard at the current location
-
Paste Style - apply the formatting style from copied content to the current topic
-
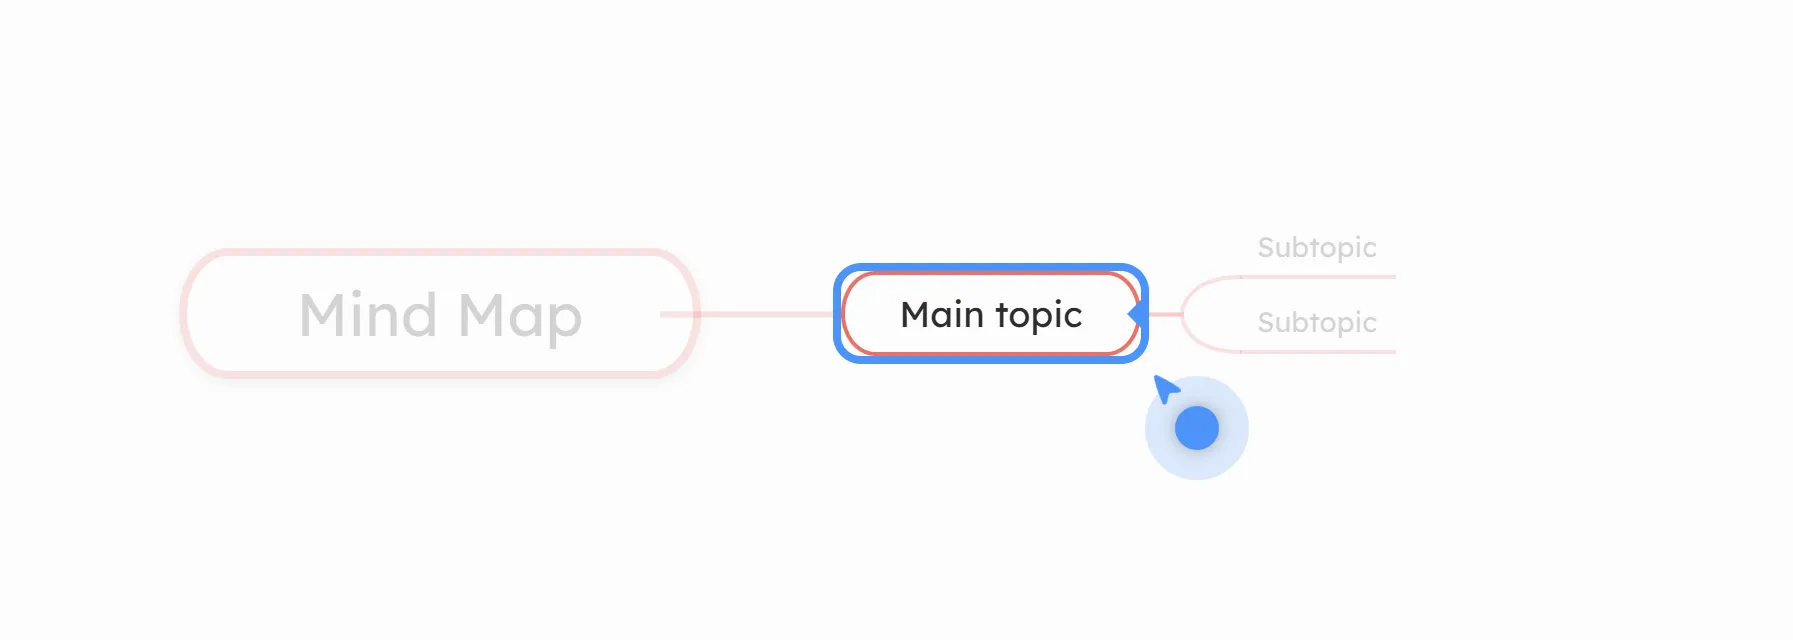
Copy link - copy the link associated with the selected topic. The copied link, when opened in a browser, will open the mind map with an arrow animation pointing to the selected topic, and the rest of the diagram will be blurred.
-
Detach topic - converts the topic into a floating topic
-
Always show topic toolbar - when this option is disabled, the toolbar is hidden. However, it can still be accessed by right-clicking a topic or by pressing Shift + F10.
-
Delete - removes selected topic
Selecting Multiple Topics
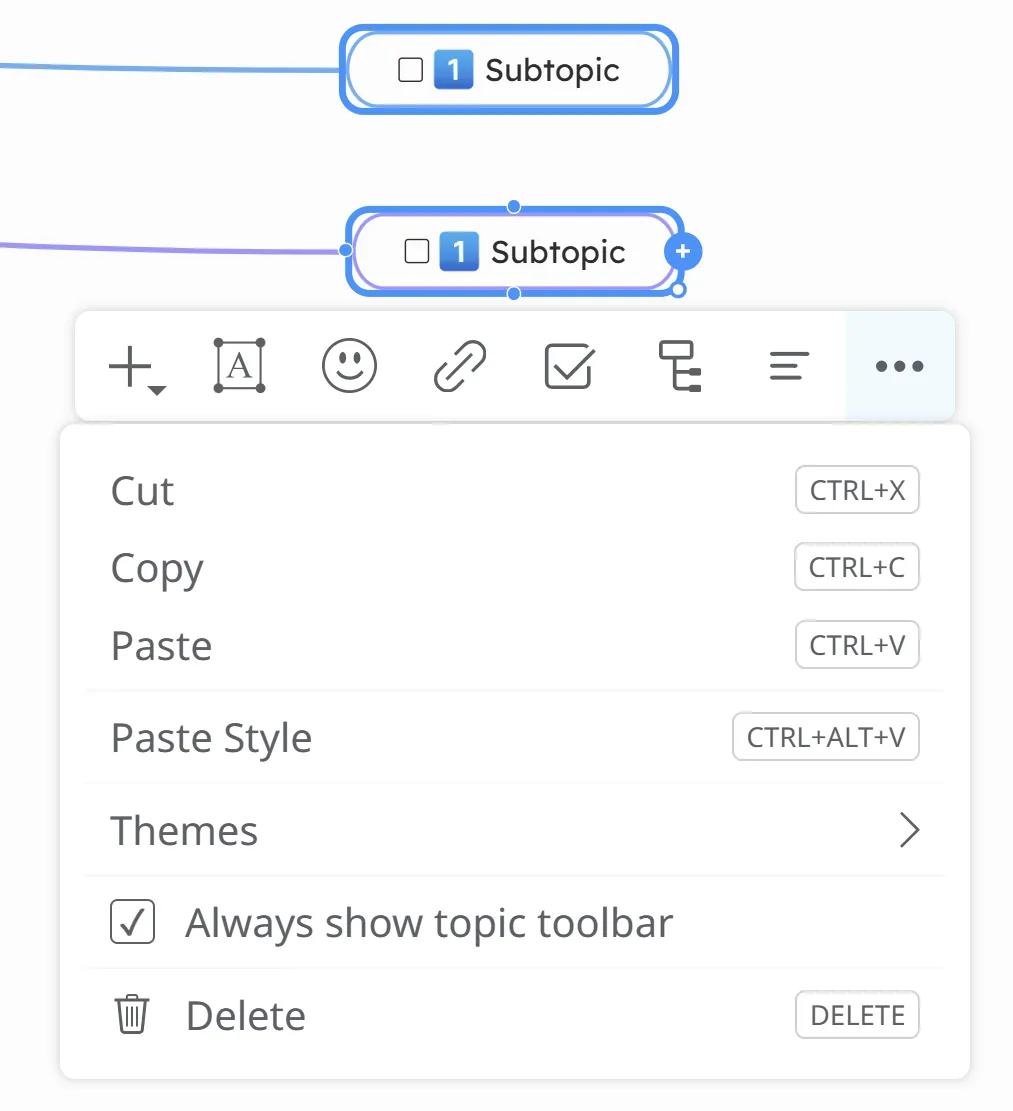
Section titled “Selecting Multiple Topics”To select multiple topics, hold down the Ctrl key and select the topics, or use Shift + drag the mouse over them. Only the relevant toolbar buttons will be displayed, as shown in the screenshots below.
Add a Background Image
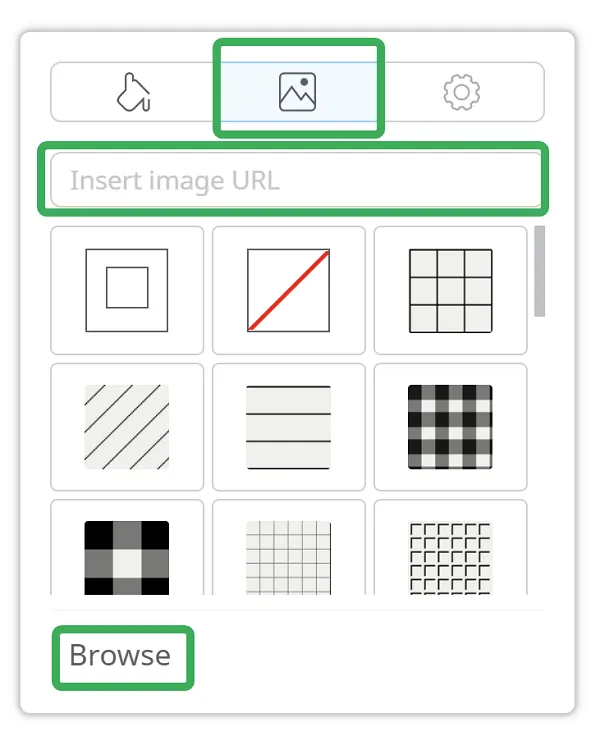
Section titled “Add a Background Image”To add an image as a background picture, right-click on the mind map’s background, then from the ‘Map Background’ panel click on the icon in the middle. You will find a few predefined background patterns and from ‘Browse’ you can add your own image. You can also add an image by inserting the URL.
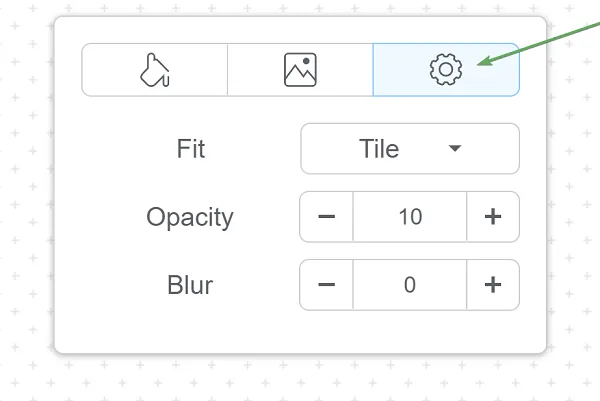
From the settings icon you can set the Fit, Opacity and Blur.
Undo & Redo changes
Section titled “Undo & Redo changes”Click on the arrows from the top toolbar to undo and redo your changes:

Changes after Undo
Section titled “Changes after Undo”If you click Undo repeatedly, the following warning will appear:
