

Create an assignment
An assignment is built in a three-step setup: Details, Student work and Assign. Only two things are actually required (a title and a class), so a working assignment takes a minute, and everything else is optional: instructions, a due date, files to work from, a grading scale, and whether students each build their own diagram or one together.
The stepper at the top tracks where you are, the footer counts the steps (Step 1 of 3) and Continue moves you on. You can click a step you have already filled in to jump straight back to it (nothing you typed is lost) and the last step ends in Publish assignment.
Start the setup
Section titled “Start the setup”You can start it in any of three ways:
- Click Create at the top of the sidebar, then choose Assignment.
- Open Assignments and click the New assignment card, pinned first in the list.
- Open a class and use its own Assignments tab, which has its own New assignment button.
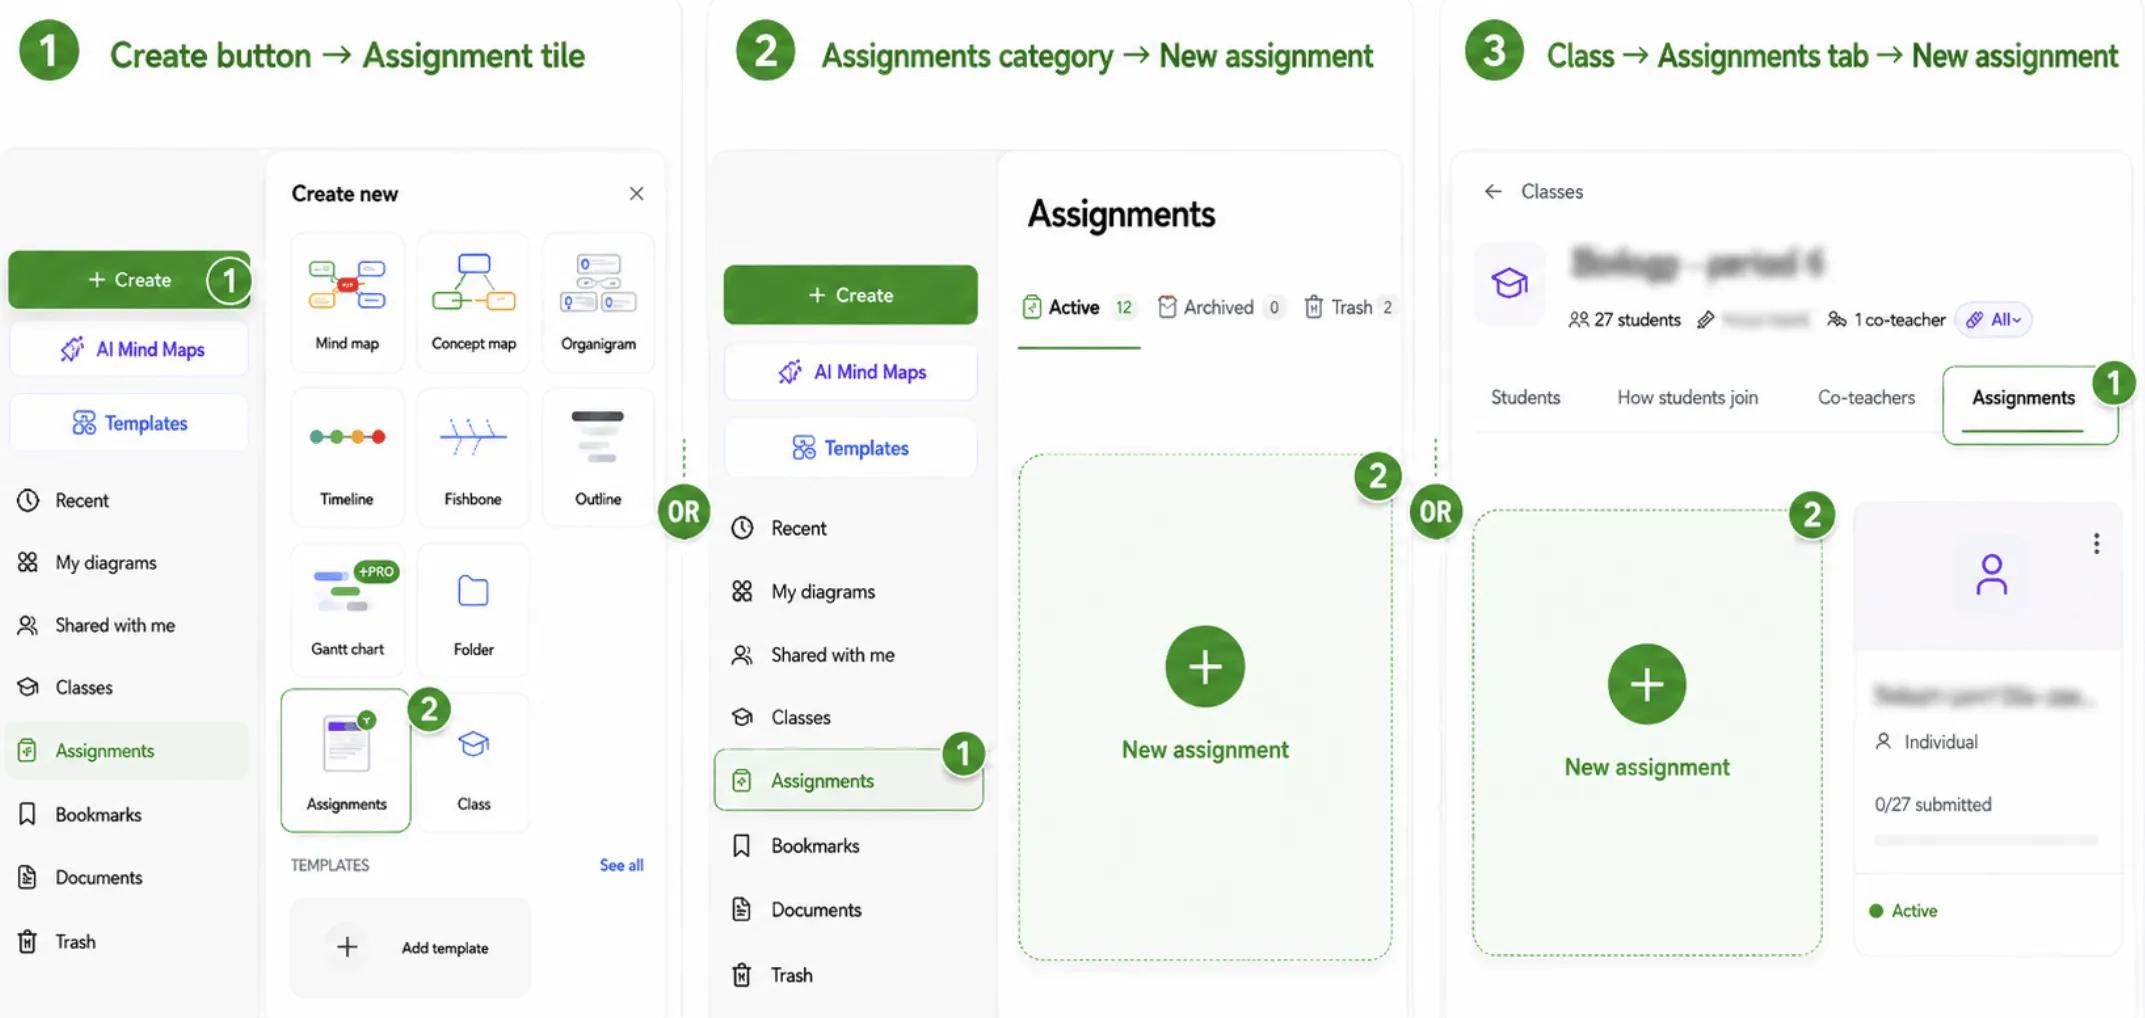
The third way is worth knowing: starting from a class page preselects that class on step 3, so all you have to do there is publish.
Step 1: Assignment details
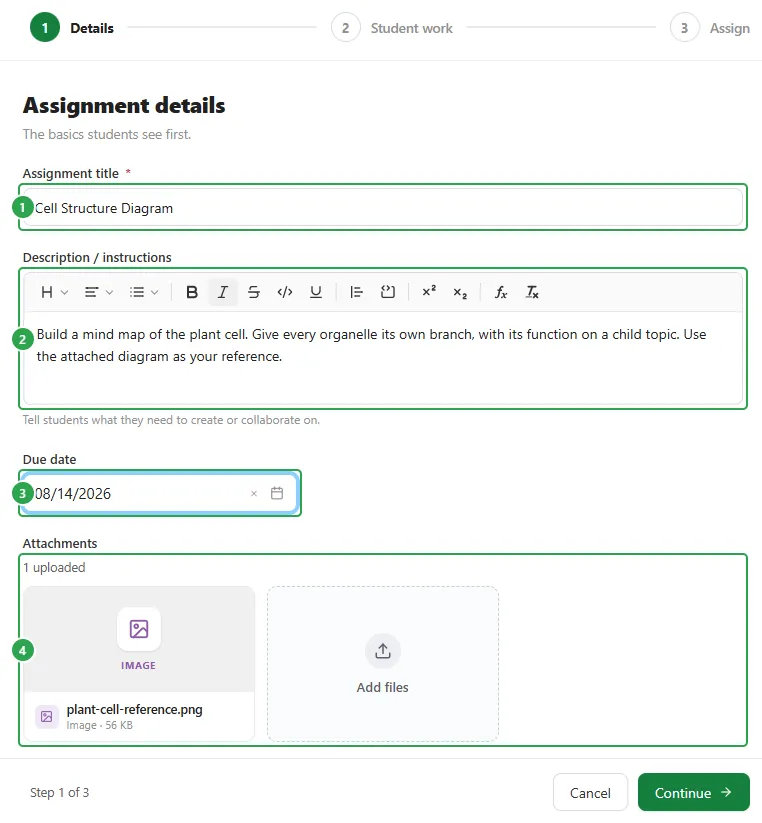
Section titled “Step 1: Assignment details”This is what students see first. Fill in the Assignment title (1), the only required field in the whole setup, and write what they have to do in Description / instructions (2). That editor is rich text: headings and alignment, lists (bullet, numbered and task), text styling (Bold, Italic, underline, strikethrough), code and code blocks, blockquote, superscript and subscript, a LaTeX Formula, and clear formatting. On a narrow window the last buttons collapse into a “more” menu.
Due date (3) opens a calendar. Days in the past are unavailable, and Remove date at the bottom of the calendar clears the date again if you decide the assignment does not need one.
Under Attachments (4) you can drag files onto the box or click browse: images and documents, PDF, DOCX, PNG and JPG, up to 25 MB each. Uploaded files appear as tiles with a running count above them, and Add files adds more.
Grading
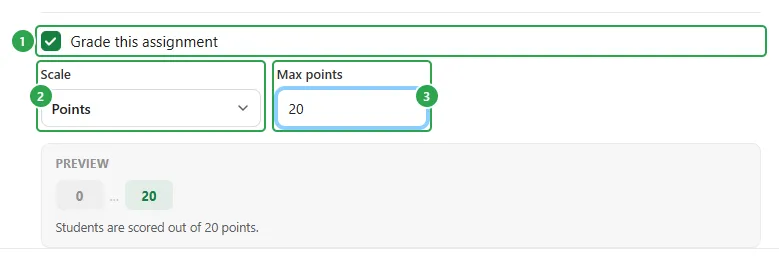
Section titled “Grading”Grade this assignment (1) is off by default. Switch it on and a Scale (2) appears, with a Preview strip underneath that shows how the grade will read to you and to the student:
- Points: plus Max points (3). Students are scored out of 20 points.
- Percentage: plus a Pass mark in percent. Scored 0–100%. Pass mark at 60%.
- Letter (A–F): A, B, C, D, F. Students receive a letter grade.
- Complete / Incomplete: Marked complete or incomplete, no numeric score.
Step 2: Student work type
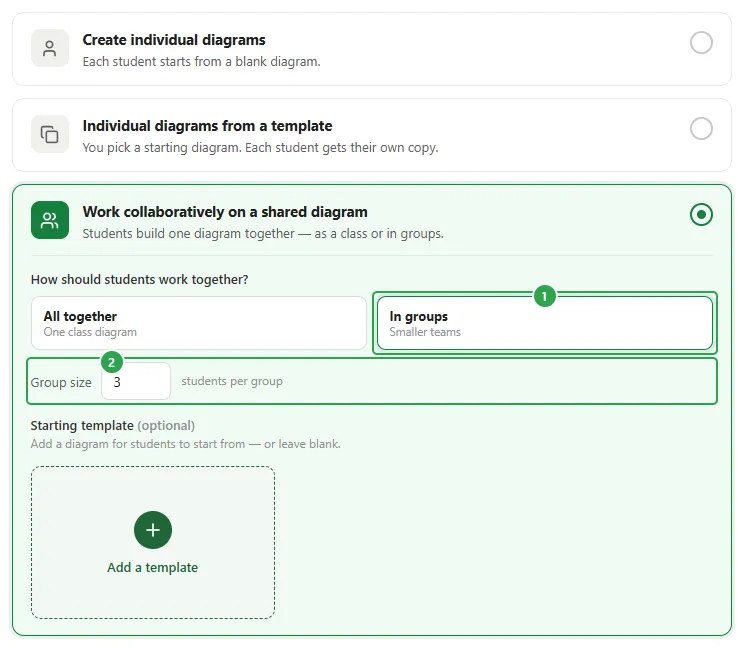
Section titled “Step 2: Student work type”The app calls this the heart of the assignment: what students will actually be doing. Three cards, one of which is always selected:
- Create individual diagrams: each student starts from their own blank diagram, with nothing pre-filled, so every diagram is built entirely from scratch.
- Individual diagrams from a template: you choose one starting diagram, either a template or one of your own, and each student gets an independent copy of it to build on, so everyone starts from the same base but works separately.
- Work collaboratively on a shared diagram: students build a single diagram together, either as one class working on the same diagram or split into smaller groups, each with their own copy to build as a team.
The configuration for the type you choose appears inside its own card. For collaborative work that is How should students work together?: All together for one class diagram, or In groups (1), which adds a Group size (2) in students per group.
Choosing a starting template
Section titled “Choosing a starting template”Add a template opens Choose a starting template, which browses the same diagrams you see in your dashboard: your own folders and diagrams, and the Mindomo Templates folder. Open a folder to see what is in it, click the diagram you want (1) and confirm with Use this template (2).
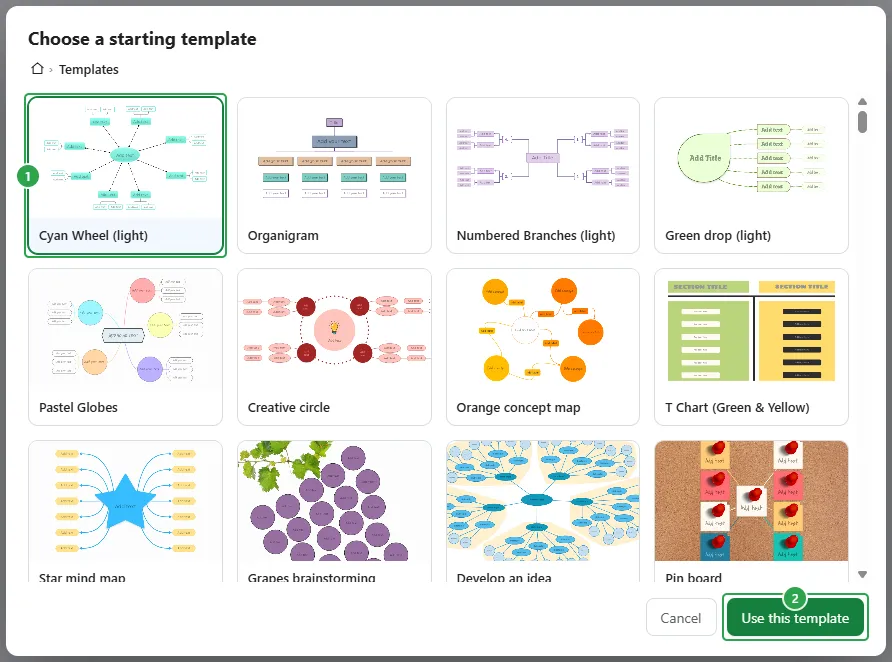
The chosen diagram then sits in the card with its name and type, where Replace swaps it for another one. Students never edit this diagram itself: each of them gets a copy of it.
Step 3: Assign to students
Section titled “Step 3: Assign to students”Who is this assignment for? Every class you teach is a card here, with its student count and its join code, so you can tell two similarly named classes apart. Pick one (1).
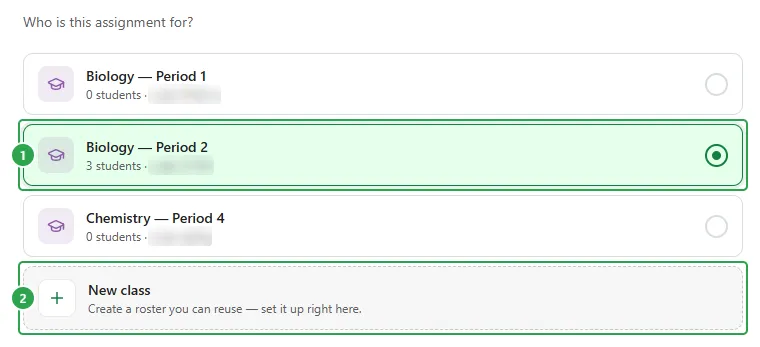
If the class does not exist yet, New class (2) creates it without leaving the setup: a Class name, a Color, and Use this class. It is staged rather than created (the card reads New class: created when you publish), and it disappears again if you change your mind and pick an existing class instead. The roster and the join code come afterwards, on the class page.
Archived classes and classes in the Trash are not offered as targets.
Publish assignment takes you to the assignment’s own page, where the join code and link are ready to share and the Joined, Started, Submitted and To review counters follow the class live.
Editing a published assignment
Section titled “Editing a published assignment”Edit on the assignment’s page reopens the same three steps, with Save changes in place of Publish assignment on the last one. Until the first student starts, everything is still yours to change, including moving the assignment to a different class, or to a brand-new one, from step 3.
Once a student has started, that changes. The Student work and Assign dots turn into padlocks and both steps become read-only, each explaining itself: At least one student has already started this assignment, so the way students complete it can no longer be changed, and on step 3, so it can no longer be moved to another class.
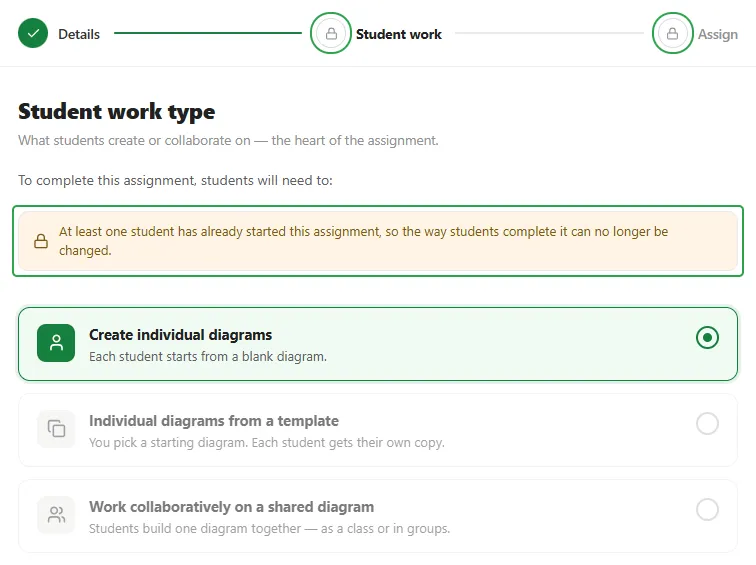
Details stays editable throughout: the title, the instructions, the attachments, the due date and the grading scale are all still yours.
An archived assignment is read-only altogether: it is hidden from students, the Edit and Share buttons are gone, and Restore is what brings it back.
View as student
Section titled “View as student”Once the assignment is published, its ⋯ (three dots) menu offers View as student, which answers “does my wording actually make sense?” without a second account. It opens a read-only replica of the student’s page under a Previewing as a student bar that reminds you actions are inert.

The scrubber (1) is the useful part: it walks the whole student journey rather than showing one moment of it. On an individual assignment that is four stages: Not started, In progress, Submitted, Graded, and you move through them with the ‹ › arrows, by clicking the dot rail, or with the ← and → keys. A collaborative assignment has five, opening with the two group-formation stages, First in and Choose a group, which the readout labels GROUP FORMATION.
Nothing you do here is recorded. Previewing does not enrol you in your own class and does not create a diagram; the statistics are exactly where you left them when you come back. Esc, or Back to teacher view (2), leaves.
Where to go next
Section titled “Where to go next”- Assignments: how assignments and classes fit together.
- Joining a class: the code, the link and the QR your students use.
- Reviewing & grading: following the work and grading it.
- Managing a published assignment: the rest of the ⋯ menu View as student lives in.
- Assignments for students: the same assignment from their side.
- Using templates: what the Mindomo templates offer as a starting point.
- Teacher package and School package: the plans that include assignments and classes.